
Frequently asked questions and trending topics from Sevocity customers. Topics and questions are continually updated to reflect the most current trends.
General Topics
How do I download Sevocity?
See Sevocity Download and Installation Instructions for step-by-step instructions for downloading Sevocity for Windows OS or Mac OS.
I forgot my password to log in to Sevocity. How do I reset it?
Users are unable to reset their password if forgotten and need to request a password reset from the clinic’s Security Administrator. Security Administrators can reset a user password by following the steps listed here.
Security Administrators are authorized to contact Sevocity Support to request a password reset for themselves but will be required to provide a valid, government-issued photo ID to confirm their identity before their password can be reset.
Can I add or change encounter modifiers?
Yes. E/M modifiers on the Coding tab can be customized by the Clinic Administrator. See Clinic Wide Form Data: Coding for step-by-step instructions for adding and updating modifiers.
What do the grey dots on the patient schedule mean?
The grey circle icons that appear next to scheduled appointments on the Desktop are encounter status indicators. An open circle with a grey outline ( ) indicates a patient has an open encounter for the appointment, and a solid grey circle (
 ) indicates a patient has a finalized encounter for the appointment.
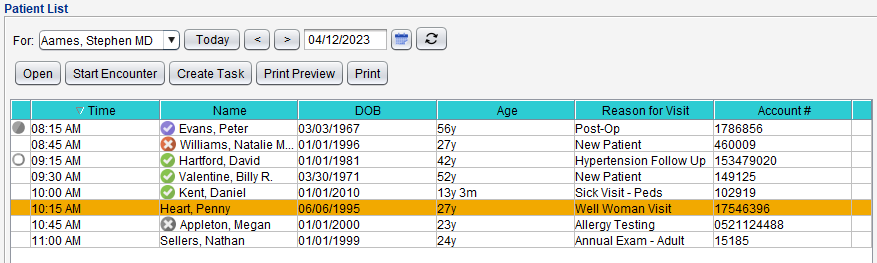
Clinic Administrators can use the Appointment Encounter Status Report to monitor the encounter status for scheduled appointments.
How can I open a patient’s chart without accessing their open encounter?
If a patient has an open encounter, opening the chart from the Active Charts list will open the encounter. To open the patient’s chart without accessing the open encounter, select the patient, hold down the ALT key and click Open or double-click the patient data row.
What is Direct Message? (And do I need it?)
Direct Message is a Sevocity feature that exchanges encrypted communication between two parties using DirectTrust (Direct) transport standards. Direct Message is used to send and receive patient information without the concern of data security that presents itself when using unencrypted email to exchange PHI .
For providers participating in the MIPS incentive program, using Direct exchange transport standards is a required element of the reportable measures.
See Direct Message Activation and Access for information on getting started with Direct Message.
What is this symbol:?
The Infobutton ( ) is a knowledge retrieval application standard that uses patient demographic information to assist clinicians in identifying appropriate patient education resources. Infobuttton can be found on the Allergies/Med Hx, Assessment, and Assessment tabs in the encounter and on the Medications/Assessments tab in the chart.
Clicking the Infobutton launches MedlinePlus Connect resources by default. However, clinics with access to or memberships with applications that meet the Infobutton standard can request a customized configuration for their Info button.
MIPS Topics
What are the MIPS reporting requirements for 2026?
For the 2026 performance year, eligible clinicians (ECs) must submit data in four reporting categories:
- Quality: measures the quality of care delivered, based on measures related to healthcare quality and outcomes of patient care. Quality accounts for 30% of the MIPS composite score.
- Cost: cost of care provided, calculated by CMS based on the EC’s Medicare claim data. Cost accounts for 30% of the MIPS composite score.
- Promoting Interoperability (PI): promotes the use of certified EHR technology for improved patient engagement and electronic exchange of information. PI accounts for 25% of the MIPS composite score.
- Improvement Activities (IA): promotes innovation and ongoing improvement to clinical activities, with a focus on areas such as coordination of care, population management, and beneficiary engagement. IA accounts for 15% of the MIPS composite score.
Data for the Quality and Cost categories must be reported for the full calendar year. Data for Promoting Interoperability must be reported for a minimum continuous 180-day period, and Improvement Activities must be reported for a minimum continuous 90-day period.
When do I need to submit my 2026 MIPS data?
The submission period to report MIPS data for the 2026 performance year will begin in January 2026.
What is a CMS EHR Certification ID?
The CMS EHR Certification ID is a 15 digit alphanumeric code required by CMS during data submission for its incentive programs, including MIPS. CMS uses this ID to verify the provider or provider group submitting data is using ONC-certified EHR technology.
How do I get a CMS EHR Certification ID?
Providers can generate their CMS EHR Certification ID from the ONC Certified Health IT Product List (CHPL) website using the CMS ID Creator tool. Instructions for generating a CMS ID can be located on the CHPL site. Note: Providers must select all certified products or modules used during the performance period for which they are submitting data when creating their ID. A list of eligible certified products and modules for Sevocity can be located here.
How do I access the files from a consolidated QRDA export?
The Consolidated QRDA Export Tool exports one or more eCQM reports in QRDA format. Because the Consolidated QRDA Export is saved in a compressed (zipped) folder, the files will need to be extracted using a compressed file utility that can unzip encrypted folders.
Sevocity Best Practice
For Windows OS users without a compressed file utility, Sevocity recommends using 7-Zip. 7-Zip is free to use and can be downloaded at https://www.7-zip.org. For macOS users without a compressed file utility, Sevocity recommends using The Unarchiver. The Unarchiver is free to use and can be downloaded at https://theunarchiver.com or from the Mac App Store.
Extract QRDA Files Using 7-Zip
- Right-click the folder
Select 7-Zip and then click Extract files…
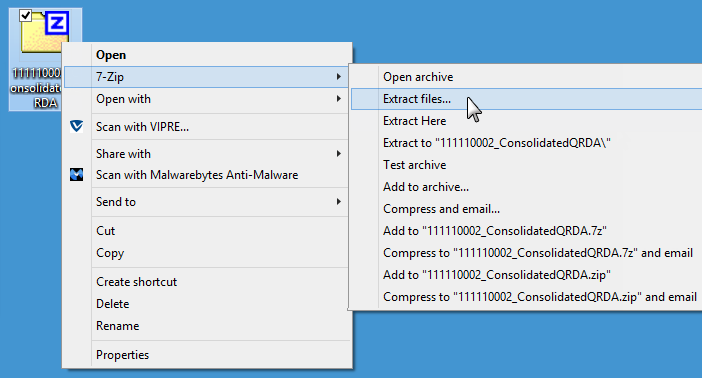
- Specify a location for the extracted files in the Extract to field
Type the password specified when creating the QRDA export in the Password field
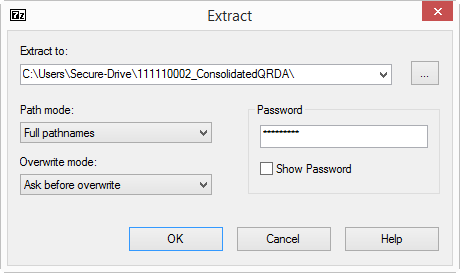
- Click OK
OR
- Double-click the folder
- Click the Extract icon (
 )
) - Specify a location for the extracted files in the Copy to field
- Click OK
Type the password specified when creating the QRDA export in the Enter password field
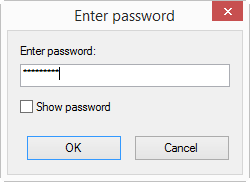
- Click OK
Extract QRDA Files Using The Unarchiver
- Right-click the folder
Select Open With then click The Unarchiver
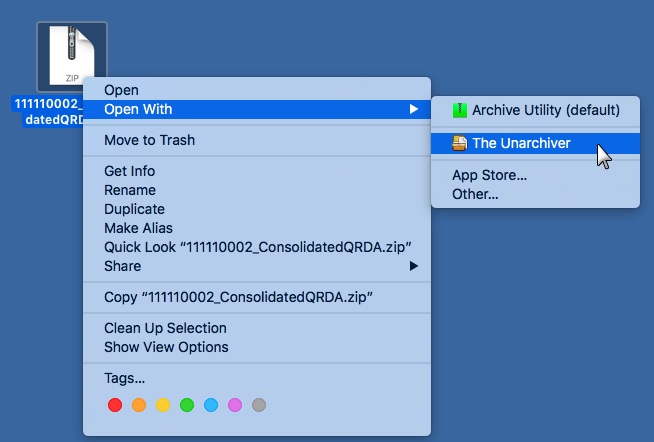
Type the password specified when creating the QRDA export in the free text field
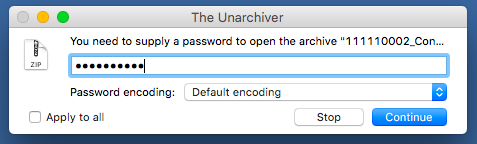
- Click Continue