The Flowsheets/Labs encounter tab is used to add Custom and Standard flowsheet data and view labs saved to the patient chart. Flowsheets and flowsheet data added to a patient record carry forward to each subsequent visit.
Encounter Types
Flowsheets/Labs is available in the following encounter types: Exam, Multi-System, Procedure, Reconciliation, Telephone, and Urgent Care.
Configuration
Custom Flowsheets and custom flowsheet Categories can be customized by the Clinic Administrator by going to Tools > Preferences > CLINIC > Flowsheets > Flowsheets
Custom flowsheet Components can be customized by the Clinic Administrator by going to Tools > Preferences > CLINIC > Flowsheets > Flowsheet Components > Begin Edit
Display options for Custom and Standard Flowsheets can be set by the Clinic Administrator in Flowsheets General
Flowsheet Display
To retrieve previously documented flowsheet data, click
This step should be performed only if Auto-retrieve has not been set for the clinic
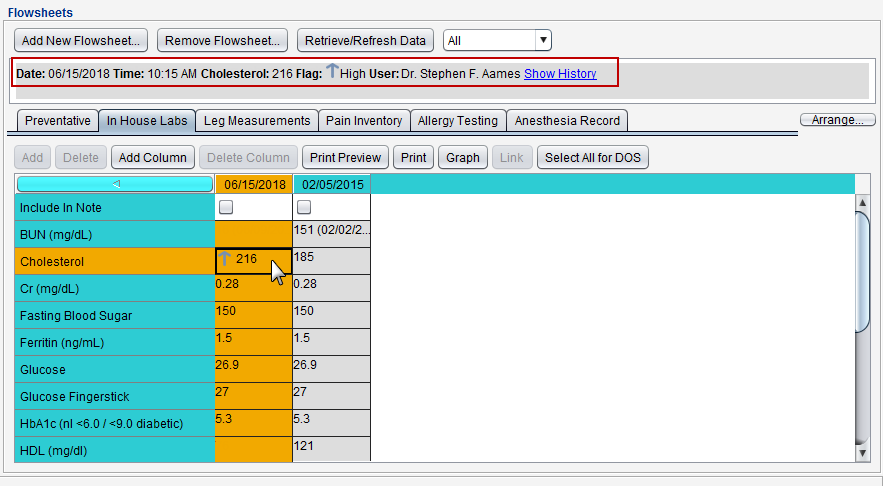
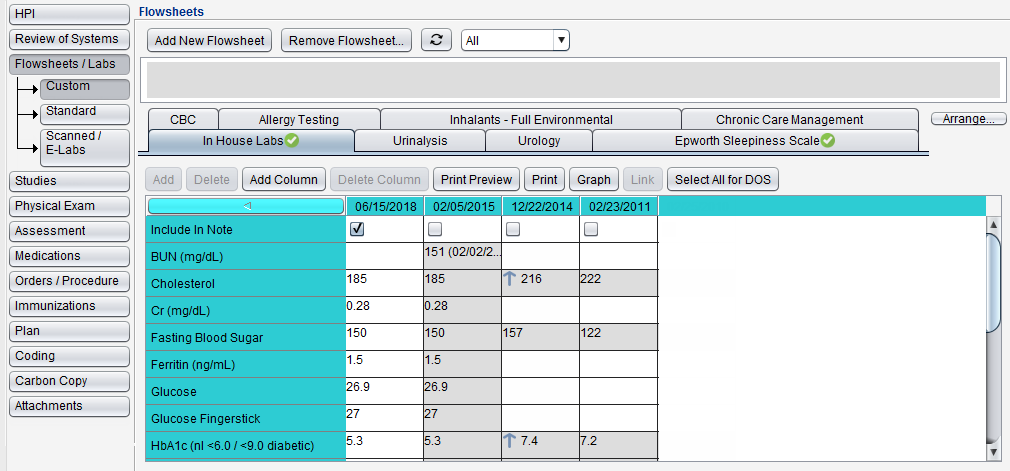
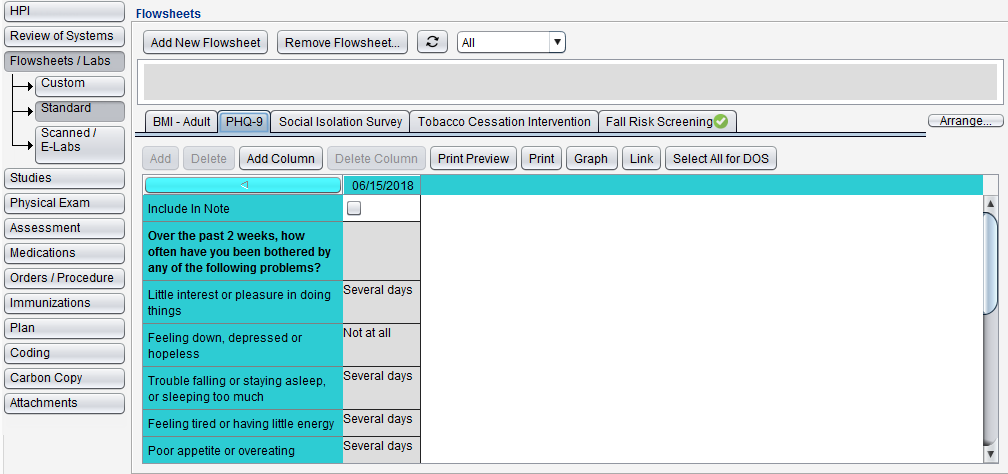
Click on a flowsheet tab to view previously documented data for the flowsheet
All flowsheet column headers display a date for the column entry
The time displays in the column header only if a time was populated for the column entry
Select any flowsheet component to display more detail
To sort the flowsheet data columns from oldest to newest or from newest to oldest, click the sort button
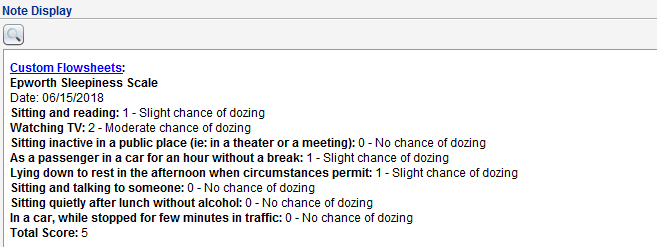
Select the Include in Note checkbox to add the flowsheet data to the encounter Note Display
Click Select All for DOS to select the Include in Note checkbox for all flowsheet entry columns with the same date of service as the encounter
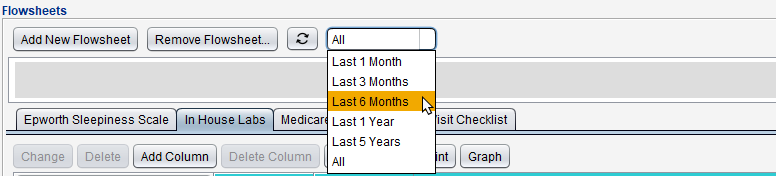
To change the amount of previously documented flowsheet data displayed, select a time interval from the selection list and click to update the data display
Changing the column sort order or data range display is a temporary adjustment. If the encounter is saved and re-opened, the column sort and data range will revert to the clinic default
Arrange Flowsheet Order
Flowsheets display in the order they were added to the patient record but can be re-ordered.
Go to Encounter > Flowsheets/Labs > Custom or Standard
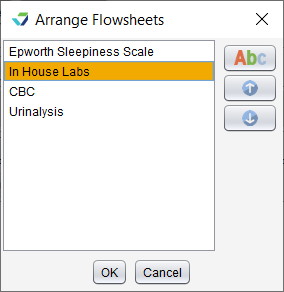
Click Arrange
Click ABC to sort the list in ascending alphabetical order (A-Z)
Select a flowsheet and click the Up arrow to move the item up one place in the list
Select a flowsheet and click the Down arrow to move the item down one place in the list
Click OK to save
Changes made to the flowsheet order are specific to the patient, and the order is retained in subsequent encounters.
Flowsheet Restrictions
Flowsheet data cannot be future-dated. Users who attempt to add flowsheet data in an encounter set to a future date will be presented with a message alerting them to this restriction.
Custom Flowsheets
Custom flowsheets are versatile and can be created to capture patient information observed or measured or to document information received from or received about a patient.
Note
Depending on the customization of the flowsheet components, some items may require specific input or formatting
Add a Custom Flowsheet
Go to Encounter > Flowsheets/Labs > Custom
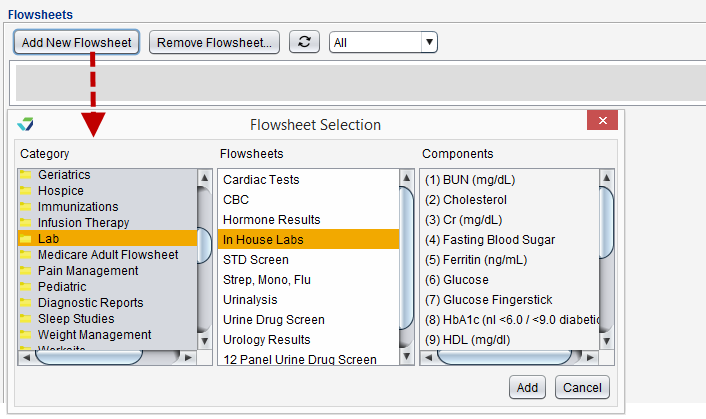
Click Add New Flowsheet
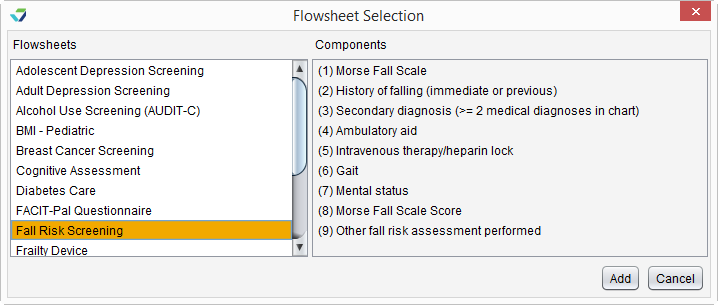
Select a flowsheet Category, then select a Flowsheet from the Category
The Components of the flowsheet are displayed for review prior to adding the flowsheet
Click Add
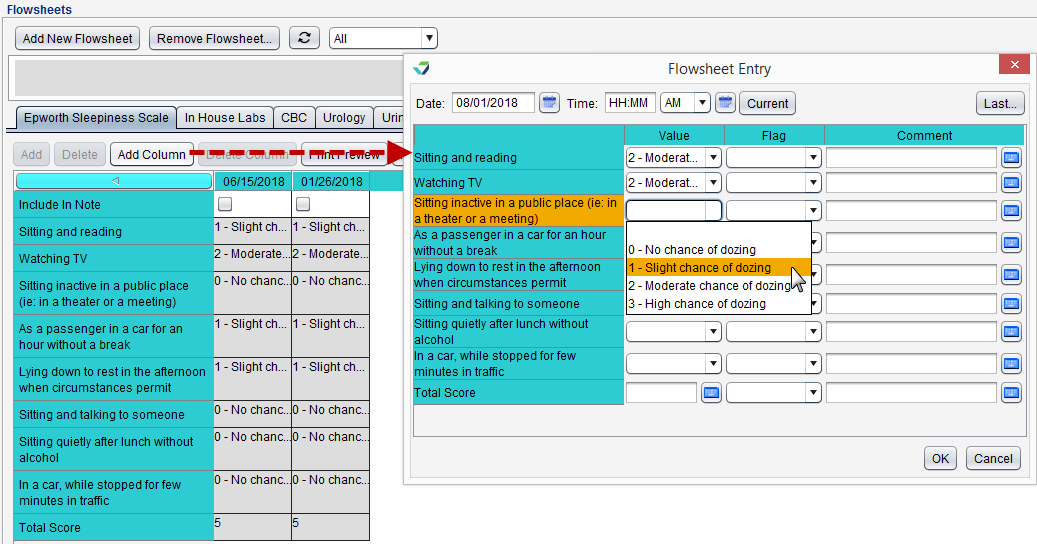
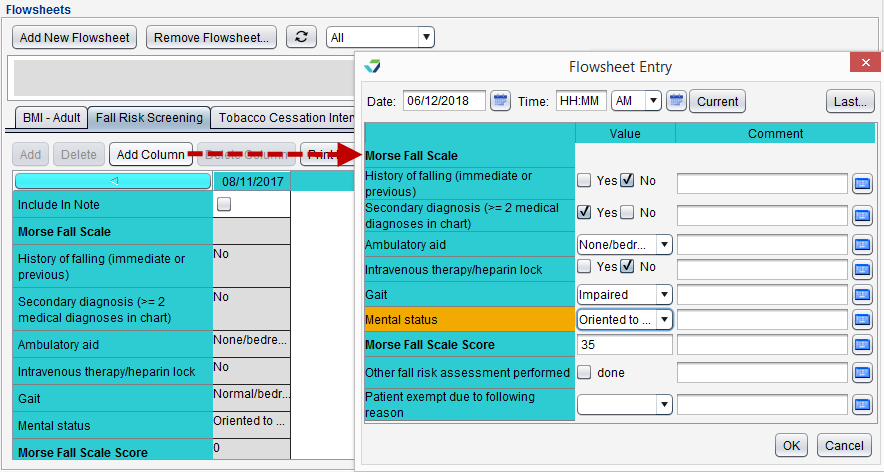
Select the flowsheet tab and click Add Column to populate the flowsheet
Optional: update the flowsheet Date and Time or click Current to populate the current date and time
Populate the appropriate fields for each component being documented
Click OK
Add Data to an Existing Custom Flowsheet
Go to Encounter > Flowsheets/Labs > Custom
Select the flowsheet tab and click Add Column
Optional: update the flowsheet Date and Time or click Current to populate the current date and time
Populate the appropriate fields for each component being documented
Click OK
Add Data to an Existing Custom Flowsheet Using the ‘Last’ Button
Go to Encounter > Flowsheets/Labs > Custom
Select the flowsheet tab and click Add Column
Optional: update the flowsheet Date and Time or click Current to populate the current date and time
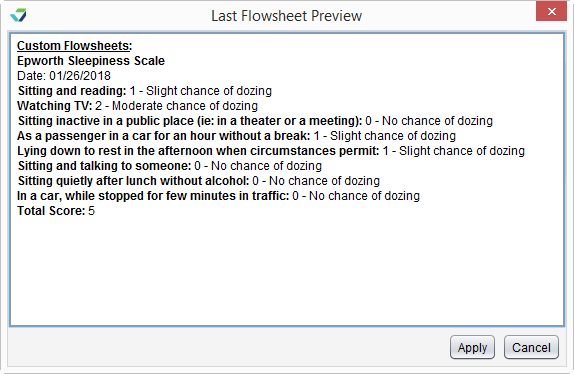
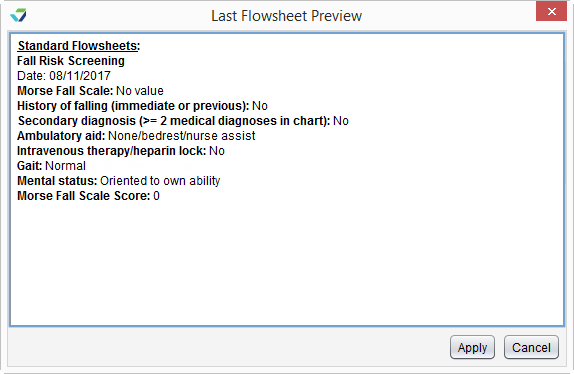
Click Last
After reviewing the previously documented flowsheet data, click Apply to apply all information to the flowsheet
Click OK
Standard Flowsheets
Standard flowsheets are tools designed to capture standardized screening information and can be used for Clinical Decision Support interventions and to document eCQM interventions and patient exceptions. These flowsheets and flowsheets components are hardcoded and cannot be customized.
The BMI and Fall Risk Screening flowsheets are automatically added to a patient’s Standard Flowsheets list based on age:
BMI – Pediatric displays for patients who are under 18 years of age on the date of the encounter
BMI – Adult displays for patients who are 18 years of age or older on the date of the encounter
Fall Risk Screening displays for patients who are 65 years of age or older on the date of the encounter
Frailty Device displays for patients who are 65 years of age or older on the date of the encounter
Add a Standard Flowsheet
Go to Encounter > Flowsheets/Labs > Standard
Click Add New Flowsheet
Select a Flowsheet
The Components of the flowsheet are displayed for review prior to adding the flowsheet
Click Add
Select the flowsheet tab and click Add Column to populate the flowsheet
Optional: update the flowsheet Date and Time or click Current to populate the current date and time
Populate the appropriate fields for each component being documented
Click OK
Add Data to an Existing Standard Flowsheet
Go to Encounter > Flowsheets/Labs > Standard
Select the flowsheet tab and click Add Column
Optional: update the flowsheet Date and Time or click Current to populate the current date and time
Populate the appropriate fields for each component being documented
Click OK
Add Data to an Existing Standard Flowsheet Using the ‘Last’ Button
Go to Encounter > Flowsheets/Labs > Standard
Select the flowsheet tab and click Add Column
Optional: update the flowsheet Date and Time or click Current to populate the current date and time
Click Last
After reviewing the previously documented flowsheet data, click Apply to apply all information to the flowsheet
Click OK
Tasks Associated with FlowsheetsRemove a Flowsheet
Flowsheets with no data columns can be removed from the flowsheet tab display.
Go to Encounter > Flowsheets/Labs > Custom or Standard
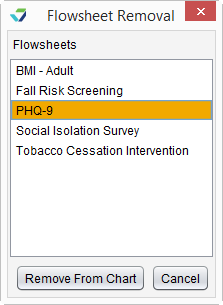
Click Remove Flowsheet
Select the flowsheet from the list
Click Remove From Chart
If the flowsheet contains data, a message will display to notify the user the flowsheet cannot be removed
Edit Flowsheet Data
Data added to the flowsheet can be changed prior to finalizing the encounter.
Select the flowsheet tab
Select the data column to edit
Click Change
Make any necessary updates to the Date, Time, or flowsheet components
Click OK
Delete Flowsheet Component Data
Individual flowsheet component values can be deleted from the flowsheet view prior to finalizing the encounter.
Select the flowsheet tab
Select the flowsheet component value
Click Delete
Click Yes to confirm decision to delete
Delete a Flowsheet Column
Flowsheet entries can be deleted prior to finalizing the encounter.
Select the flowsheet tab
Select the data column to delete
Click Delete Column
Click Yes to confirm decision to delete
All data in the flowsheet entry will be deleted and cannot be restored
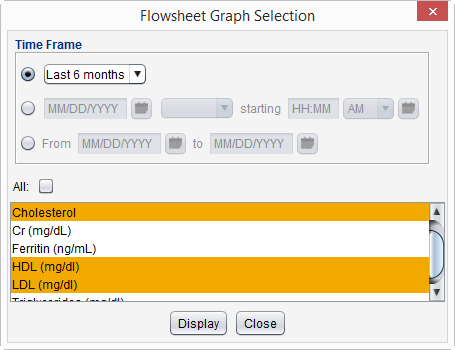
Graph a Flowsheet
A graph can be generated for flowsheets with numeric components.
Select the flowsheet tab
Click Graph
Select and populate a Time Frame for the flowsheet data
Select one or more flowsheet components to graph or select the All checkbox
Click Display
Include in Note
Select the Include in Note checkbox to add the flowsheet column data to the encounter Note Display.
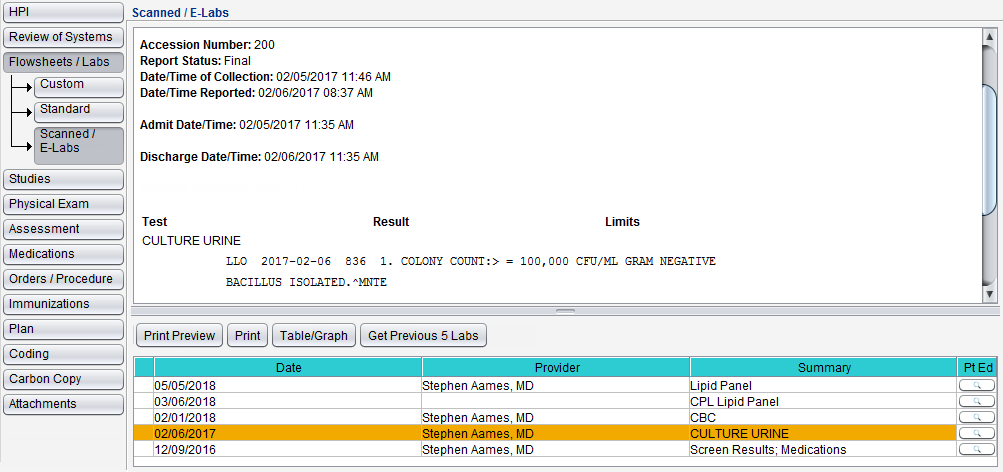
Scanned/e-Labs
The Scanned/e-Labs tab displays a patient’s Imported Documents with the category of Lab and stored e-Lab results from the Clinic Inbox.
Select a lab or e-Lab from the list to view its contents
To view an attached image file, select the file and click View
To view attached files that are not images, select the file and click Open/Save
Click Get Previous 5 Labs to view more/older lab results
Click Table/Graph, then click Graph to graph numeric e-Lab results
Click in the Pt Ed column to access patient education resources for the lab result selected