
The Physical Exam (PE) tab captures findings from a provider’s physical examination of the patient.
- Clinics using 1995 E/M coding guidelines use a multi-system exam
- Clinics using 1997 E/M coding guidelines can choose between a multi-system exam or a single organ system exam
Encounter Types
Physical Exam is available in the following encounter types: Exam, Multi-System, Reconciliation, and Urgent Care.
Configuration
- Images used in the Drawing Tool are customizable at the user and CLINIC level. Go to Tools > Preferences > CLINIC or [user] > Application Settings > Drawing Images
- The clinical content in each body area and organ system is customizable at the user and CLINIC level. Go to Tools > Preferences > CLINIC or [user] > Clinical Content > Begin Edit and select the PE category
Sevocity Best Practice
Clinical content should be customized at the CLINIC level and copied to all users at the clinic to ensure consistent documentation in the patient record
Structured Physical Exam
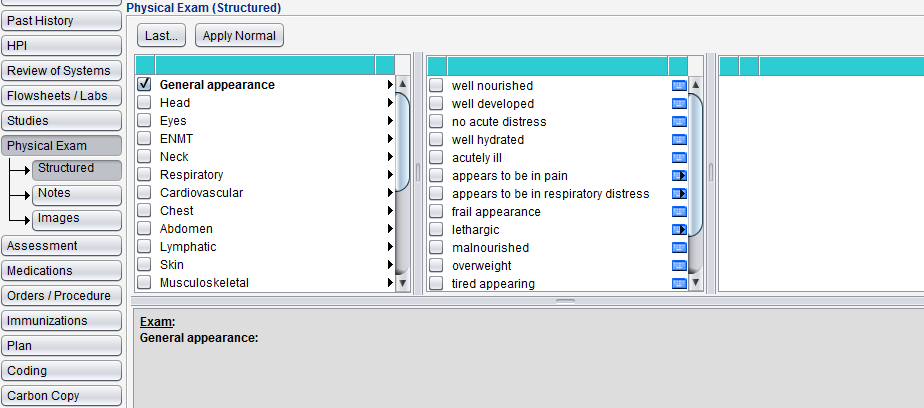
Structured Physical Exam for 1995 E/M Coding Guidelines
The Structured multi-system Physical Exam is comprised of 10 body areas and 12 organ systems:
General Appearance (Constitutional) ● Head ● Eyes ● Ears, Nose, Mouth, Throat ● Neck ● Respiratory ● Cardiovascular ● Chest ● Abdomen ● Lymphatic ● Skin ● Musculoskeletal ● Back ● Right Upper Extremity ● Left Upper Extremity ● Right Lower Extremity ● Left Lower Extremity ● Gastrointestinal ● Genitourinary ● Genitalia ● Neurological ● Psychiatric
Each area and system contains a list of elements that can be selected to document the exam findings.
Genitourinary and Genitalia display different elements based on the patient’s Birth Sex
Structured Physical Exam for 1997 E/M Coding Guidelines
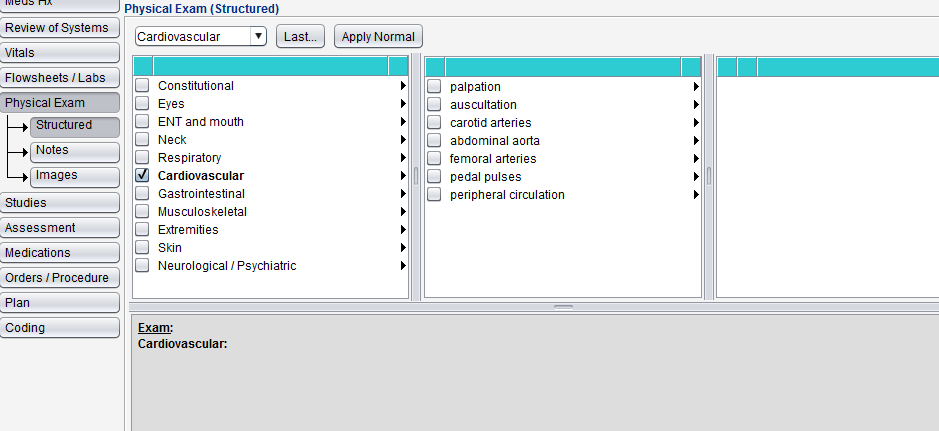
The Structured multi-system Physical Exam is comprised of 2 body areas and 12 organ systems:
Constitutional ● Eyes ● ENT and Mouth ● Neck ● Respiratory ● Cardiovascular ● Chest (Breasts) ● Gastrointestinal ● Genitourinary ● Lymphatic ● Musculoskeletal ● Skin ● Neurologic ● Psychiatric
Additionally, there are 10 single organ system exams available for use:
Genitourinary ● Musculoskeletal ● Respiratory ● Hem/Lymph/Immun ● Neurological ● Cardiovascular ● ENT ● Skin ● Eye ● Psychiatric
Each area and system contains a list of elements that can be selected to document the exam findings.
Genitourinary displays different elements based on the patient’s Birth Sex
Note
Depending on the customization of the clinical content, some items may require additional input or description details when selected
Document a Physical Exam
- Go to Encounter > Physical Exam > Structured
- Optional for 1997 E/M Coding Guidelines exam: select the exam type from the selection list
- Click a body area or organ system relevant to the visit and select all the elements that correspond to the exam findings
- Repeat for each area or system examined

The dynamic display field will display the structured Physical Exam as it is being documented.
Using the ‘Apply Normal’ Button
Clicking Apply Normal and selecting one or more body area or organ systems will select all elements that are designated as Normal findings for those areas. Clicking Apply Normal and selecting Select All will select Normal findings for all body areas and organ systems.
Click Apply to add these selections to the physical exam documentation.
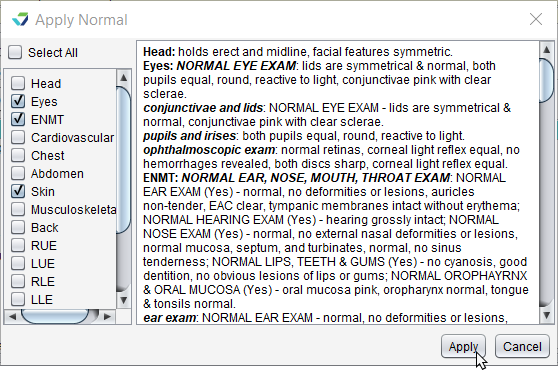
The designation of a ‘Normal’ finding is assigned to elements in the physical exam when customizing the PE clinical content.
Document a Physical Exam Using the ‘Last’ Button
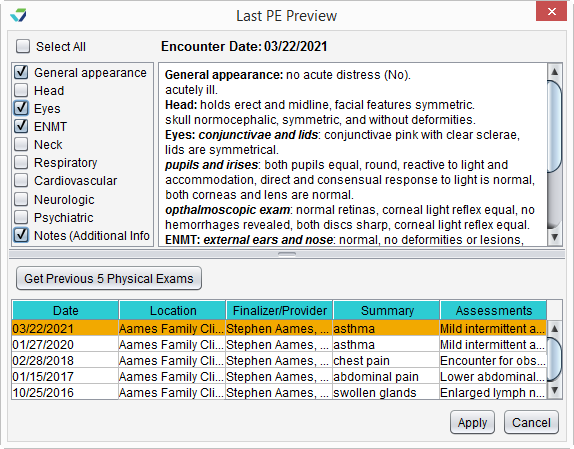
The Last button can be used to populate the current PE with information documented during any of the patient’s previous encounters.
- Go to Encounter > Physical Exam > Structured
- Click Last
- Select the encounter with the PE to be used
- Only encounters that are the same Encounter Type as the current visit will display for selection
Optional: click Get Previous 5 Physical Exams to view more/older encounters
- After reviewing the previously documented PE, click the Select All checkbox to apply all information to the current PE or select the checkbox for the individual areas or systems to apply only that information to the current PE
- Narrative text from the Notes tab can be included by selecting the Notes (Additional Info) checkbox
- Click Apply
Notes Tab
Notes is a free text area. Type any related information in this field.
Images Tab
The Images tab is used to add images or documents related to the physical exam. Images can be imported from a local computer, captured with a webcam, or created within the tab using the Drawing Tool.
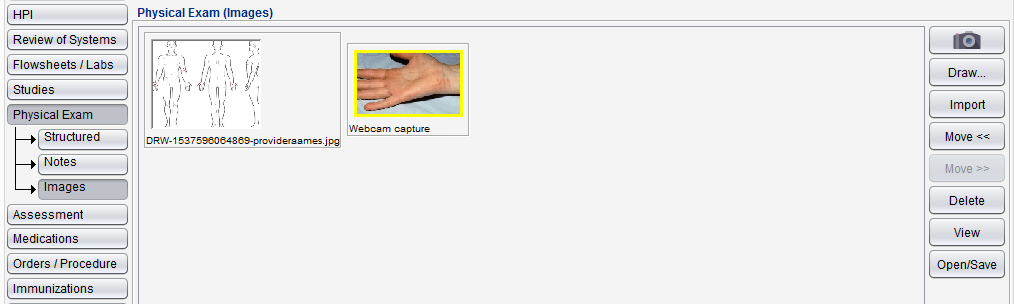
Import an Image or Document
- Go to Encounter > Physical Exam > Images
- Click Import
Locate and select the file from the local computer and click Open
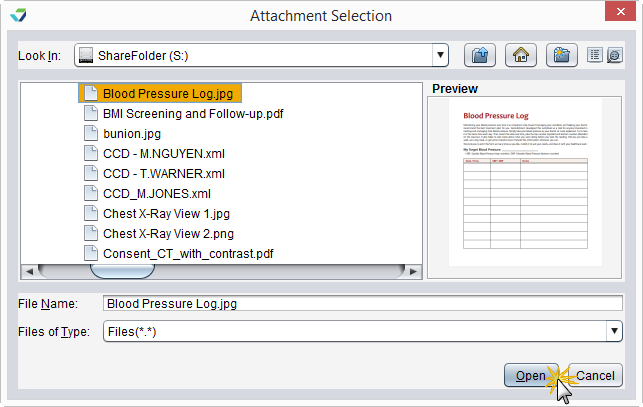
- Optional: Repeat the process to attach more files
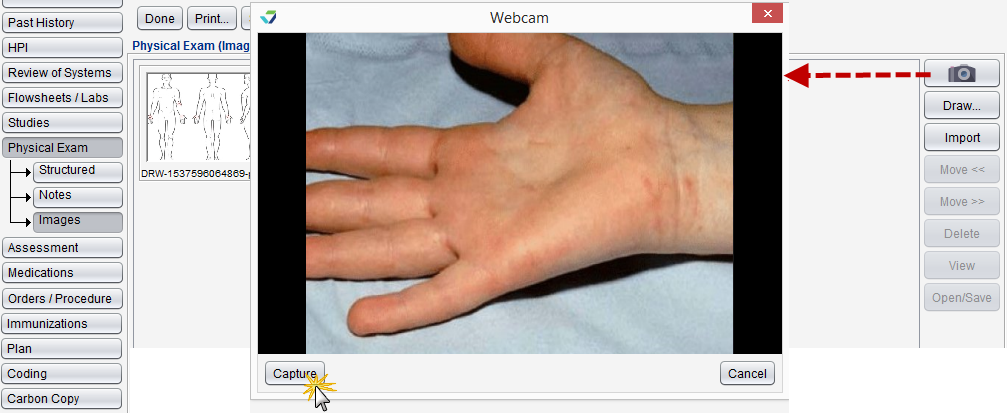
Add a Photo Using a Webcam (Windows OS Only)
- Go to Encounter > Physical Exam > Images
- Click

- Click Capture
Add an Image Using the Drawing Tool
- Go to Encounter > Physical Exam > Images
- Click Draw
- Select a Background image for the drawing or click and click Capture to take a photo
- Optional: type a Description for the drawing
- Use the drawing tools to complete the drawing:
- Pencil: click
 , select a line width, and select a color from the palette to draw with the pencil tool
 - Shape: click
 , select a shape, and select a color from the palette to add shapes to the image
- Use the slider to make the shape larger or smaller
- Text: click
 , select a font size, select a font style, and select a color from the palette to add text to the image
 - Eraser: click
 and select a line width to erase any pencil lines or shapes on the image
- Pencil: click
- Click OK

Tasks Associated with Images
View an Image or Document
 Select a file and click View
Only image file types (e.g., .png, .jpg) can be viewed within Sevocity. Use Open/Save to view other file types
Delete an Image or Document
 Select a file and click Delete, then click Yes to confirm decision to delete
Open or Save an Image or Document
 Select a file and click Open/Save. The file will open in the default program for the file type and can be viewed or saved to the local computer or directory
Organize Images and Documents
 Select a file and click Move << to move the file one place to the left
 Select a file and click Move >> to move the file one place to the right