The Desktop displays upon logging in to Sevocity.

Desktop Display
- The logged in User name and Clinic information display at the top of the Desktop
- Users with access to the allergy and medication module can access patient prescription information from the Prescription Status links
- The number of requested Refills, prescription change requests from the pharmacy (Rx Change), Pending prescriptions, and prescriptions that Need Signing display for users with the ability to prescribe
- Status links with actionable items will display in burnt yellow text
Notification Icons display for new user and clinic notifications. Double-clicking an icon opens the tab corresponding to the notification. The number on each icon denotes the number of new or unread notifications for each item type:
 (clipboard): user Task received
 (green envelope): Clinic Inbox message received
 (blue envelope): Direct Message received
 (orange envelope): user Message received
 (purple envelope): Patient Portal message received
 (Sevocity logo): Sevocity notification received
The following tabs and features are available from the Desktop:
System Menus
System Menus contain navigation and personalization features, tools, and support resources:
| Help Menu: displays links to Sevocity support resources | |
| Tools Menu: contains administrator tools and user tools | |
| Reports Menu: opens the Reporting Tool to access Sevocity reports | |
| User Menu: contains personalization and log out options |
Feature Tabs
Click on a tab from the Desktop to navigate to each feature.
| Tasks/Msgs: displays tasks and messages sent to a user by another clinic user | |
| Clinic Inbox: displays lab results received through a clinical interface | |
| Pt Inbox: displays messages received from patients enrolled in the portal | |
| Direct Inbox: displays Direct messages received from providers and healthcare organizations | |
| Fax: displays faxes received through the Sfax interface | |
| Pt Rmdrs: used to document communication with patients included in specific population health management criteria |
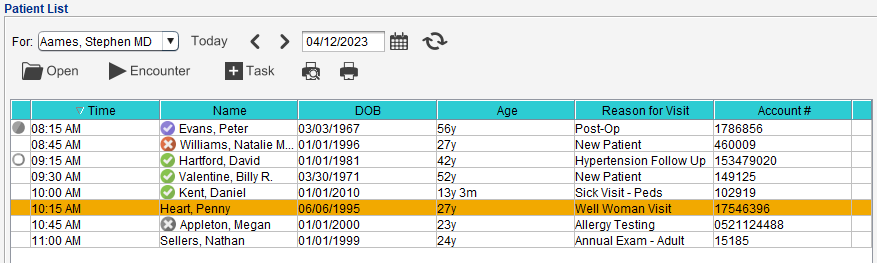
Patient List
The Patient List displays patient appointments scheduled for the selected provider or resource.
Patient List Display
Users with a Billing ID in their user profile display in the provider selection list.

- Users can set their schedule to display upon login by going to Tools > Preferences > [user] > Application Settings > General and selecting the Automatically pull schedule checkbox
- Users without a billing ID can select this checkbox and then select a provider or resource from the For User list to set a default schedule display
- Clinic Administrators can set the Patient List display to the schedule of the logged in user only by going to Tools > Preferences > CLINIC > Clinic Settings: Display and selecting the Limit provider schedule display to current user only checkbox
- The ability to view cancelled appointments on the patient list can be enabled by the Clinic Administrator by going to Tools > Preferences > CLINIC > Clinic Settings: Display and selecting the Display cancelled appointments on patient list checkbox
The Patient List defaults to the current date but can be adjusted using these features:
- Today button: sets the calendar view to the current date
 (back) and
  (forward) buttons: advance the calendar view backward or forward in one-day increments
 (calendar): opens a calendar for the selection of a specific date
Appointments
Appointments on the patient list are generated from a practice management (PM) system interface. Changes to appointments cannot be made through the Patient List and must be updated in the PM system. Clinics without a PM interface are able to add and update appointments manually.
- The Patient List refreshes automatically but can be updated on demand by clicking

- The following status icons can display next to a patient appointment:
 (green check mark): patient checked in
 (purple check mark): patient checked out
 (red x): no-show appointment
 (grey x): cancelled appointment
 (white/open circle): patient has an open encounter for the appointment
 (grey circle): patient has a finalized encounter for the appointment
- The absence of an open or finalized encounter icon indicates an encounter has not been created for the appointment
- To create a task from the patient list, select the patient and click

- To view a patient’s chart or current open encounters, select the patient and click
 or double-click the patient data row
Create an Encounter for a Scheduled Appointment
Permissions
Users must have an Access Level of Restricted Chart Entry or Full Chart to create a new encounter.
Encounters for scheduled appointments should be created directly from the Patient List. Using a workflow different than the steps listed below will not associate the encounter with the scheduled appointment.
- From the Desktop, select the appointment and click Start Encounter
- Select the encounter Type
- Optional: select the encounter Location
Click OK
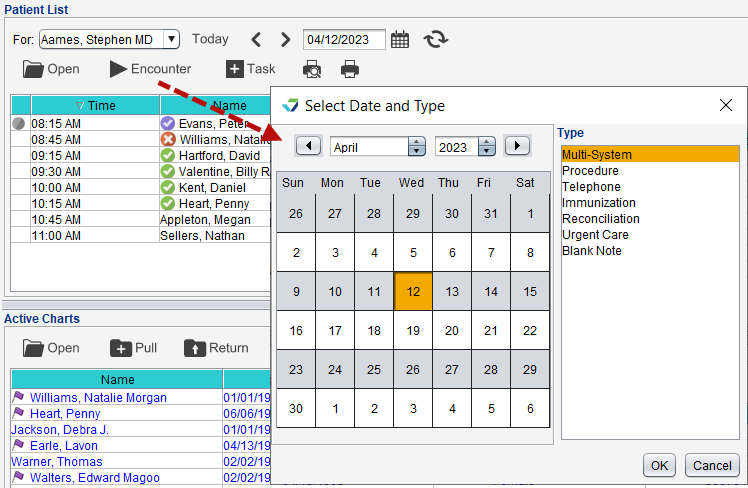
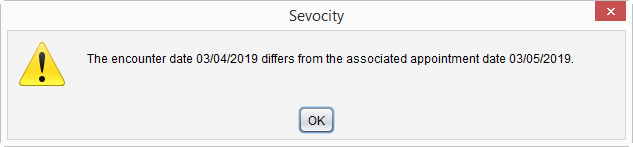
The date and time for encounters created from the Patient List will default to the scheduled appointment date and time. Selecting a different date will prompt a warning on the encounter creation window and each time the encounter is opened.
Active Charts
The Active Charts list displays patient charts accessed by the user.
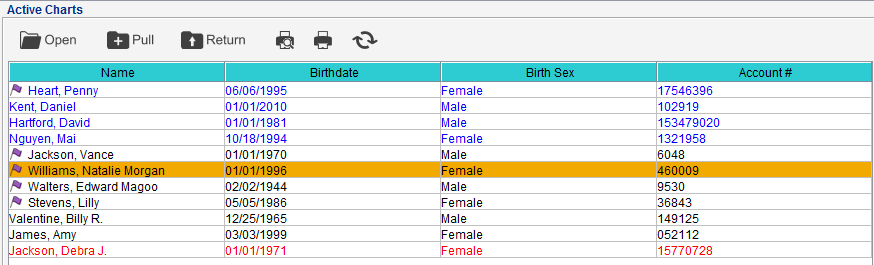
- Charts displayed in black text indicate the patient does not have an open encounter
- Charts displayed in blue text indicate the patient has one or more open encounters and will display at the top of the Active Charts list
- Charts displayed in red text indicate the patient is inactive or deceased
- A purple flag displays for patients enrolled in the patient portal

- A red flag displays for patients whose patient portal access has been revoked

- To remove a chart from the Active Charts list, select the patient and click

- To remove multiple charts, hold down the CTRL key and select the individual charts or hold down the SHIFT key to select a range of charts and click
- If the patient has an open encounter, the chart cannot be returned
- To remove multiple charts, hold down the CTRL key and select the individual charts or hold down the SHIFT key to select a range of charts and click
- To open a chart from the Active Charts list, select the patient and click or double-click the patient data row
- If the patient has one open encounter, click Open to open the encounter or click Open Chart to open the chart
If the patient has multiple open encounters, the Current open encounters list will display. Select an encounter and click Open to open the encounter or click Open Chart to open the chart
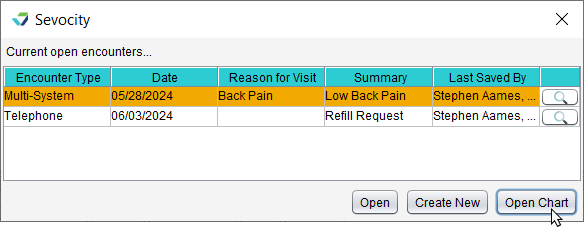
Optional: to view the encounter details prior to opening it, click the
 button next to the encounter
- To directly open the chart only for a patient with one or more open encounters, select the patient, hold down the ALT key and click or double-click the patient data row
- To close the window without making a selection and return to the Active Charts list, click the X in the upper-right corner of the window
- To refresh the Active Charts list, click
Search for a Patient
- From the Active Charts list, click

- Type the patient information in one or more of the patient search fields
- A search cannot be performed on First Name or Sex criteria only
- Optional: refine the search results by specifying any of the following filters:
- Search Mode: select Exact to return results that are an exact match to the typed information or leave defaulted to Partial to include partial match results
- Search For: select Inactive/Deceased, All, or leave defaulted to Active to display patients who match the selected status in the search results
- Clinic Provider: select a provider or leave defaulted to All to display patients assigned to the selected Clinic Provider
- Optional: Click Build Patient List to add multiple patients to the Active Charts list.
Click Search
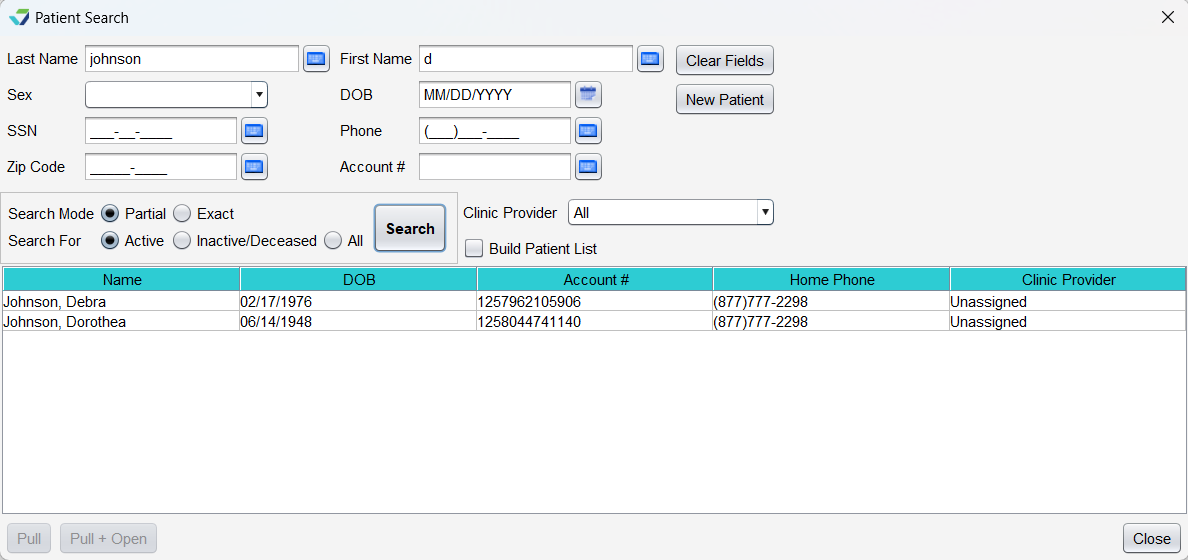
- From the Patient Search results, select a patient and click Pull to add the patient to the Active Charts list or click Pull + Open to add the patient to the Active Charts list and open the patient chart
Clicking Clear Fields resets the search criteria to enable the user to perform another patient search.
Create a Patient Chart
- From the Active Charts list, click
- Perform a patient search to verify the chart does not exist
- Click Create Chart
- Populate the required fields:
- Last Name
- First Name
- Sex
- DOB
- Clinic Provider
- Acct #
- Type the number in the field or click Generate Temporary Account Number
- Account # can be alphanumeric
- Zip Code
- Populate the remaining demographic fields if the information is available
- Click New Patient
- Click OK to acknowledge the patient has been created
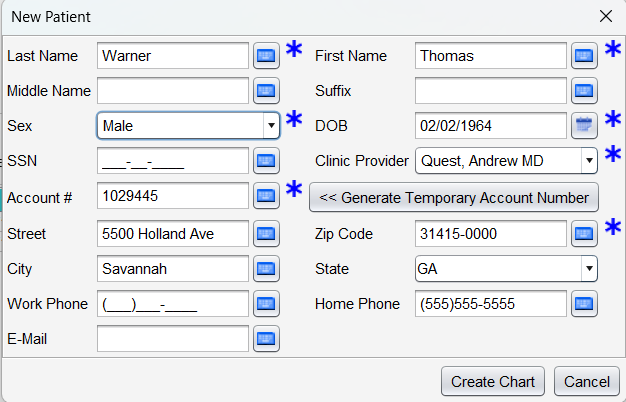
The new patient chart will display in the Patient Search results. Click Pull to add the patient to the Active Charts list or click Pull + Open to add the patient to the Active Charts list and open the patient chart.
Warning
Clinics with a practice management (PM) system interface should create patient charts in the PM system. Charts created in Sevocity are not created in the PM system and could result in duplicate patient records.