Clinic Inbox
The Clinic Inbox displays lab results received through a clinical interface. From the Clinic Inbox, users can view, route, and store lab results. The Clinic Inbox is only accessible by clinics with a live clinical interface.
A clinical interface can also transmit other items to the Clinic Inbox, such as ultrasound or radiology reports
To access and manage items in the Clinic Inbox, a user must have one or more of the following permissions selected in their user profile:
- Can access clinic inbox: displays the Clinic Inbox tab on the Desktop and enables a user to view and route results
- Can sign electronic labs: enables a user to sign and store results
- Can discard electronic labs: enables a user to delete items from the Clinic Inbox
- Selection items for the Add Note Add From Favorites list and the Route Message Add From Favorites list are customizable at the user and CLINIC level. Go to Tools > Preferences > CLINIC or [user] > Form Data > Begin Edit and select Labs from the Tab list
- Messaging Groups are customizable at the user and CLINIC level. Go to Tools > Preferences > CLINIC or [user] > Application Settings > Message/Task Groups
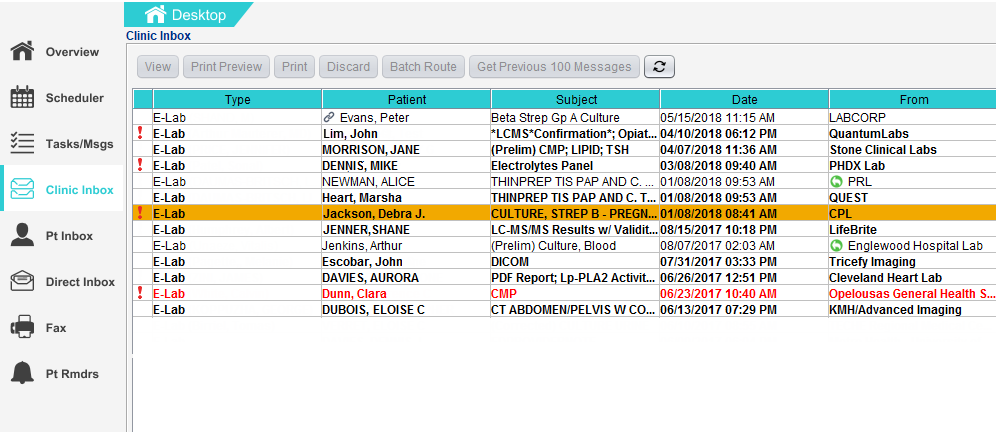
The Clinic Inbox displays the item Type, Patient name, lab Subject, the Date and time the result was received, and the name of the sender (From).
- To view a lab result, select the result and click View or double-click the result
- Lab results that have not been viewed display in bold face text
- A red exclamation point displays next to lab results that contain an abnormal value
- Lab results that contain a critical value display in red text
- A grey chain link displays next to lab results that are matched to a patient
- Preliminary (Prelim) lab results can be viewed and routed but cannot be signed
- Click Get Previous 100 Messages to view more/older lab results
The Inbox refreshes automatically but can be updated on demand by clicking 
A green envelope icon (![]() ) will display in the notifications area when a new lab result is received. Double-clicking on the notification icon will navigate the user to the Clinic Inbox.
) will display in the notifications area when a new lab result is received. Double-clicking on the notification icon will navigate the user to the Clinic Inbox.
The number that appears on the icon is the number of new or unread messages in the Inbox. If there are no new or unread messages in the Inbox, the icon will not be visible
To delete a lab result, select the result and click Discard. To delete multiple lab results, hold down the CTRL key and select individual lab results or hold down the SHIFT key to select a range of results and click Discard.
A message will display to verify the user would like to discard the lab result before deleting it from the inbox. Click Yes to delete.
Once deleted, a lab result cannot be retrieved or restored
- Go to Desktop > Clinic Inbox
- Select the lab result and click View or double-click the result
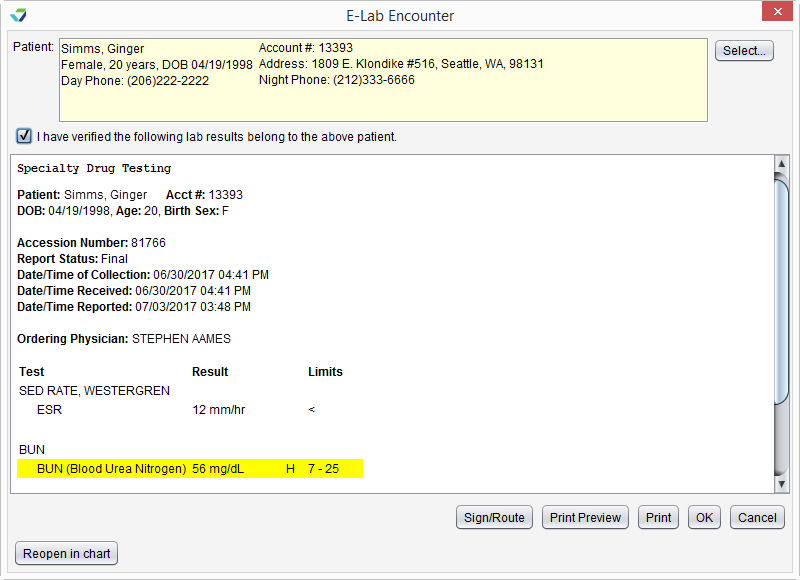
- If the lab result is systematically matched to a patient, the Patient section will be populated in the lab result display
- If the lab result is not matched or the matched patient needs to be changed, the user will need to search for the patient
- Optional: click Select to search for and select a patient
- Select the I have verified the following lab results belongs to the above patient checkbox
-
Review the lab result
- Click Sign/Route
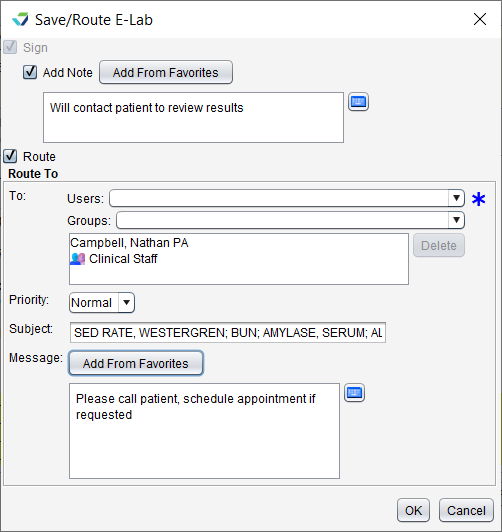
- Optional: select Add Note and type a note in the free text field or click Add from Favorites and select one or more items from the list
-
Optional: select Route to send a message linked to the saved lab result to other users or groups
- Click OK
Signed lab results are stored to the patient chart in the Imported Documents tab.
After a lab result is signed, the result is removed from the Clinic Inbox
- Go to Desktop > Clinic Inbox
- Select the lab result and click View or double-click the result
- If the lab result is systematically matched to a patient, the Patient section will be populated in the lab result display.
- If the lab result is not matched, or the matched patient needs to be changed, the user will need to search for the patient
- Optional: click Select to search for and select a patient
- Select the I have verified the following lab results belongs to the above patient checkbox
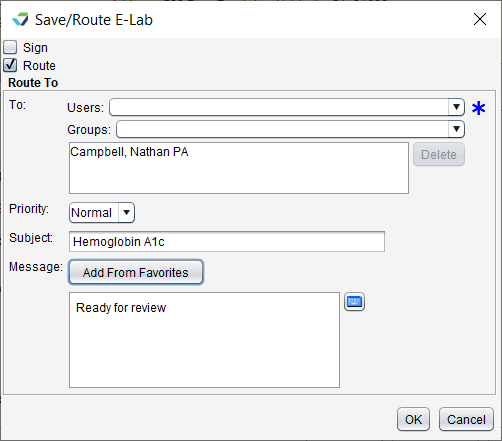
- Click Route or Sign/Route
- If clicking Sign/Route, clear the Sign checkbox and select the Route checkbox
- Search for and select a user or group from the To list
- Multiple individual users, multiple groups, or a combination of users and groups can be selected
- Select a Priority for the message or leave defaulted to Normal
-
Type a note in the Message field or click Add from Favorites and select one or more items from the list
- Click OK
A green arrow icon will display in the From field for routed labs. Selecting the lab will display the routing detail.
Routing a lab result does not sign or save the result
The Batch Route feature is only available to users without the ability to sign labs.
- Go to Desktop > Clinic Inbox
- Hold down the CTRL key and select individual lab results or hold down the SHIFT key to select a range of results
- Click Batch Route
- If a lab result is systematically matched to a patient, the Patient section will be populated for each eligible lab.
- If a lab result is not matched, or the matched patient needs to be changed, the user will need to search for the patient(s).
- Optional: click Pull Chart to search for and select a patient for all labs without a patient match
- Select the I have verified the following lab results belongs to the above patient checkbox for each lab result
- Optional: update the Priority for each lab or leave at the original value
- Search for and select a user or group from the To list
- Multiple individual users, multiple groups, or a combination of users and groups can be selected
- Click Send
- The Send button remains disabled until all labs in the batch have verified patient matches
Didn't find the answer you were looking for?
Contact Sevocity Support 24/7 at 877‑777‑2298 or support@sevocity.com


