Orders and Referrals
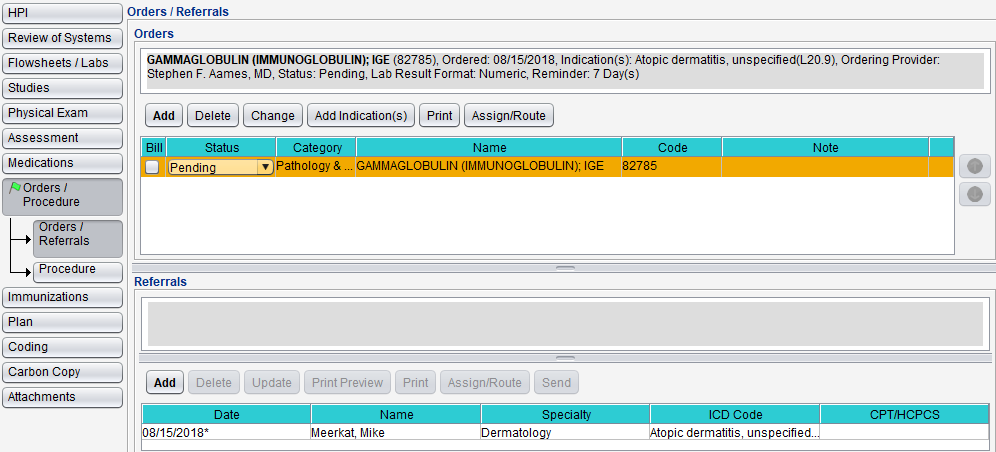
The Orders/Referrals tab is used to create lab and diagnostic test orders and provider referrals. Depending on the encounter type, the Orders/Referrals tab displays as its own tab or as a subtab of Orders/Procedures.
If a patient has pending orders, a green flag ( ) displays next to the tab name.
Orders/Referrals is available in the following encounter types: Exam, Multi-System, Procedure, Reconciliation, Telephone, and Urgent Care. Orders is available in Immunization.
- The Favorite Orders list is customizable at the user and CLINIC level. Go to Tools > Preferences > CLINIC or [user] > Form Data > Begin Edit and select Orders from the Tab list and Favorite Orders from the Item list
- The order Note list is customizable at the user and CLINIC level. Go to Tools > Preferences > CLINIC or [user] > Form Data > Begin Edit and select Orders from the Tab list and Notes from the Item list
- The Clinic Administrator can customize the CPT Modifiers and HCPCS Modifiers by going to Tools > Preferences > CLINIC > Clinic Wide Form Data > Begin Edit and selecting Orders from the Tab list
- The Clinic Administrator can set the orders Reminder default time span in Clinic Settings: Alerts/Reminders/CDS
- The referral Reason for Referral/Notes list is customizable at the user and CLINIC level. Go to Tools > Preferences > CLINIC or [user] > Form Data > Begin Edit and select Referrals from the Tab list
- The referral ICD Code Add from Favorites list is customizable at the user and CLINIC level. Go to Tools > Preferences > CLINIC or [user] > Form Data > Begin Edit and select Assessment from the Tab list
- Task assignment Groups for referrals are customizable at the user and CLINIC level. Go to Tools > Preferences > CLINIC or [user] > Application Settings > Message/Task Groups
- The selection list for the Task Description Add From Favorites is customizable at the user and CLINIC level. Go to Tools > Preferences > CLINIC or [user] > Form Data > Begin Edit and select Task List from the Tab list
- The referral CPT/HCPCS Add Favorites list utilizes the Add Order Favorites list
The orders list displays all pending orders for a patient and any new orders added during the visit. The list displays the order Status, Category, Name, CPT, HCPCS, or SNOMED Code, and Note information.
- Select the order to view more details. The details display in the area above the orders list
- Select Bill to bill an order for the encounter
- An order must have at least one indication to be billed
- The order Status can be updated directly from the orders list
- Go to Encounter > Orders/Procedure > Orders/Referrals
- Click Add
- Select a favorites Category and select an order code or click Search CPT Master List or Search HCPCS Master List
- If using the CPT or HCPCS Master List, search for and locate the order code and click Save
- From the Add Order(s) window, add or update any of the following fields as they relate to the order:
- # of Units: type a value in the numeric field
- Reminder: select the checkbox and specify the time frame to send an order reminder to the Message inbox
- Lab Result Format: choose from Numeric, Positive/Negative, or Other
- Modifier: add up to four modifier codes from the selection list or click Search Mod List to search for and select a code from the CPT or HCPCS Modifiers master list
- Note: type a information about the order or for the patient in the text field or click Add from Favorites, select one or more notes, and click OK
- Indication: add up to four indications from the patient's active problem list
- Adding an indication does not assess the problem for the encounter
- Ordering Provider: defaults to the user adding the order
- Bill: select if the order will be billed for the encounter
- An order must have at least one indication to be billed
- Status: choose from Pending, Complete, or Not Performed
- Optional: if Complete is selected, populate the date field with the date the order was completed. If left blank, the order completed date will default to the encounter date
- Optional: if Not Performed is selected, select a Not Performed Reason
- Click Add
Clinics with a Quest bi-directional interface are able to order and send labs electronically. Lab results are delivered to the Clinic Inbox.
- The Favorite eLab Orders list is customizable at the user and CLINIC level. Go to Tools > Preferences > CLINIC or [user] > Form Data > Begin Edit and select Orders from the Tab list and Favorite eLab Orders from the Item list
- Label Printer Settings can be configured in Machine Specific settings or by clicking the gear icon (
 ) on the Print button
-
Go to Encounter > Orders/Procedure > Orders/Referrals
-
Click eLabs
-
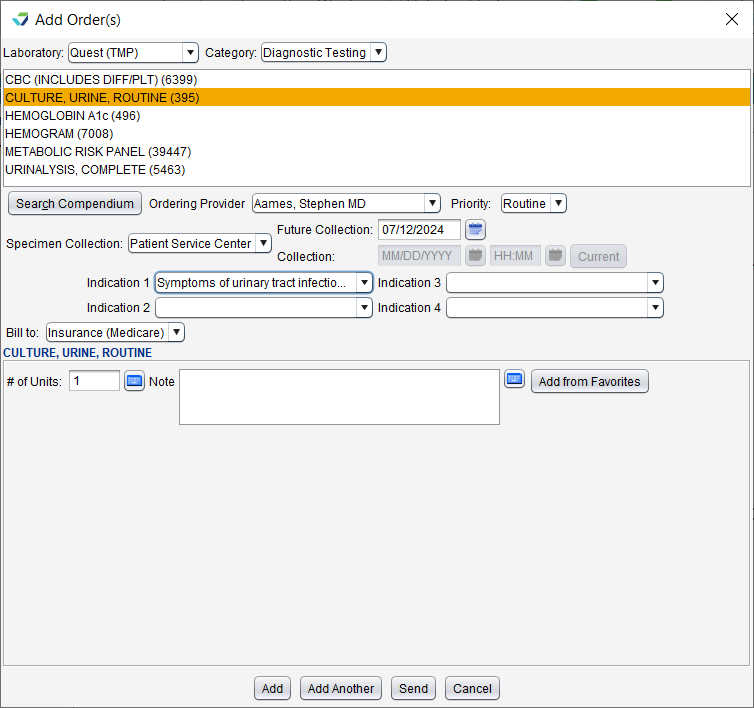
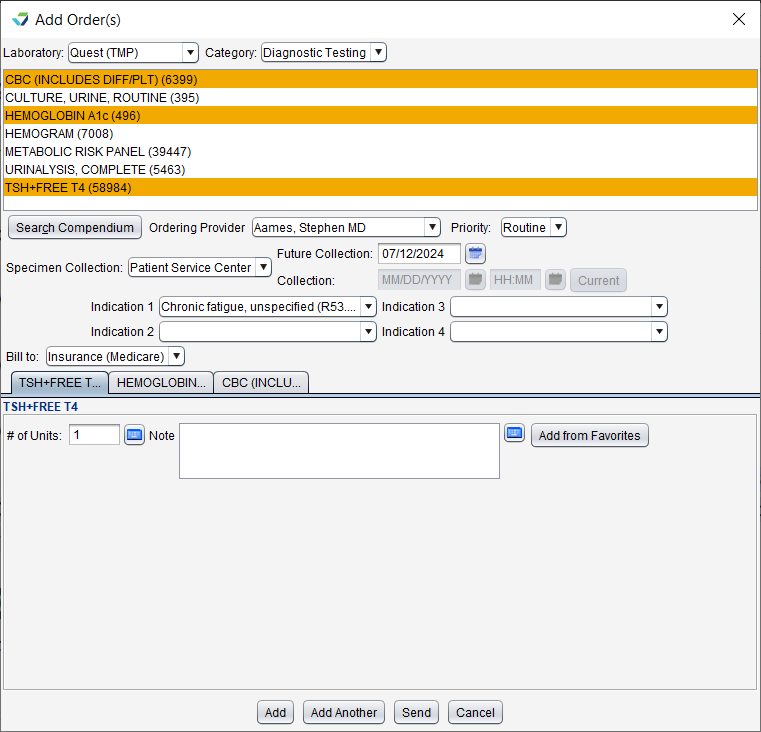
From the Add Order(s) window, select a favorites Category and select a lab from the list or click Search Compendium to search for and select a lab
-
Populate the details as they relate to the lab:
-
Update Ordering Provider, Priority, and Bill to fields, if needed
-
Specimen Collection is required
-
Optional: if Patient Service Center is selected, populate Future Collection date or if In House is selected, populate Collection date and time
-
-
At least one Indication is required
-
-
Click Send to submit the lab order or click Add to add the lab to the Orders list or click Add Another to add the current lab to the Orders list and create another single lab order
-
Clicking Send requires a Collection date and time to be populated for In House labs or a Future Collection date to be populated for labs sent to a Patient Service Center
-
-
Go to Encounter > Orders/Procedure > Orders/Referrals
-
Click eLabs
-
From the Add Order(s) window, add multiple labs by selecting a favorites Category and then selecting labs from the list, by clicking Search Compendium to search for and select labs, or through a combination of both methods
-
Populate the details as they relate to the labs. The details will apply to all labs selected:
-
Update Ordering Provider, Priority, and Bill to fields, if needed
-
Specimen Collection is required
-
Optional: if Patient Service Center is selected, populate Future Collection date or if In House is selected, populate Collection date and time
-
-
At least one Indication is required
-
-
Click Send to submit all lab orders or click Add to add the labs to the Orders list
-
Clicking Send requires a Collection date and time to be populated for In House labs or a Future Collection date to be populated for labs sent to a Patient Service Center
-
Labs can be submitted electronically directly from the Add Order(s) window by clicking the Send button or from the Orders list by selecting the lab(s) and clicking the Send eLab(s) button.
-
Clicking Send will require a Collection date and time to be populated for In House labs or a Future Collection date to be populated for labs sent to a Patient Service Center, if this information has not been added to the order(s)
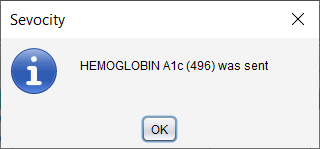
A confirmation message will display when a lab has been sent.
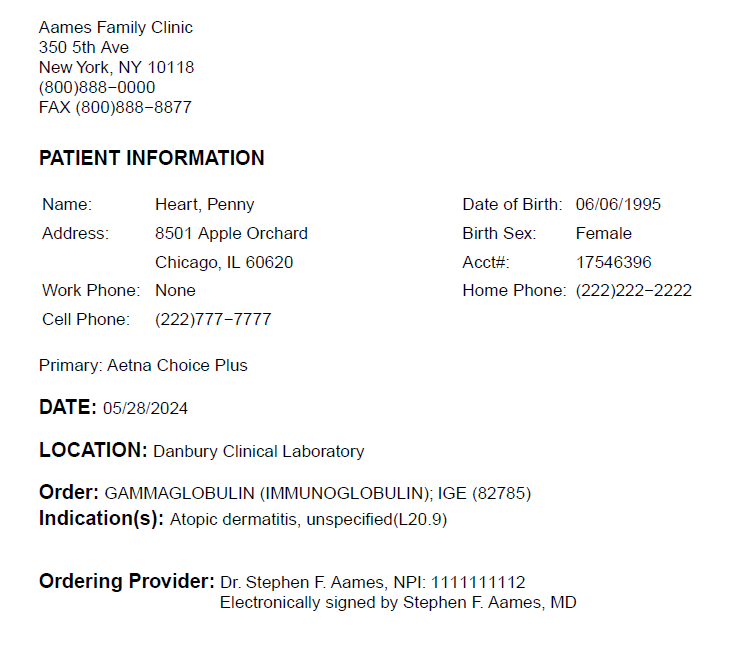
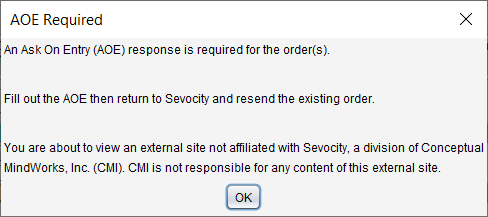
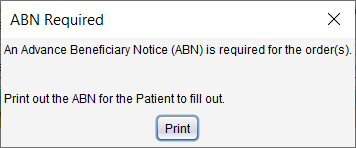
Some labs may require the completion of an Ask on Entry (AOE) form before the lab order can be sent. If Medicare is selected in the Bill to order field, an Advance Beneficiary Notice (ABN) is required to be printed for the patient before the lab order can be sent. In some instances, both an AOE and ABN will be required.
-
To complete an AOE, click OK on the AOE Required window and complete the AOE on the external site. Return to Sevocity to send the order.
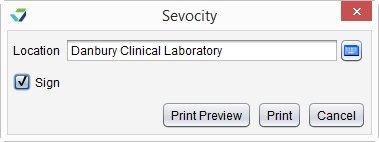
Test labels can be printed for orders with an In House specimen collection. Labels can be printed when sending an order or directly from the Orders list.
-
Upon sending an order, the confirmation message will display Print labels options for each In House order.
-
Optional: clear the checkbox for labs that do not need a label printed
-
Optional: update the default number of labels to be printed
-
Click Print
-
From the Orders list, select one or more labs and click Labels
-
Optional: clear the checkbox for labs that do not need a label printed
-
Optional: update the default number of labels to be printed
-
Click Print
- Select the order and click Change
- Add or update any necessary information
- The order cannot be changed
- Click Save
Orders can be routed to other users in the clinic for review or to perform tasks related to the order.
- Select the order and click Assign/Route
- Populate the Due Date for the task or leave defaulted to the current date
- Select a Priority for the task or leave defaulted to Normal
- Populate the Task Description
- Click Add from Favorites and select one or more items from the list or type the task description in the free text field
- Search for and select a user or group for task assignment
- Multiple individual users, multiple groups, or a combination of users and groups can be selected
- Click Save to assign and route the task
The Referrals section displays any referrals created in the encounter.
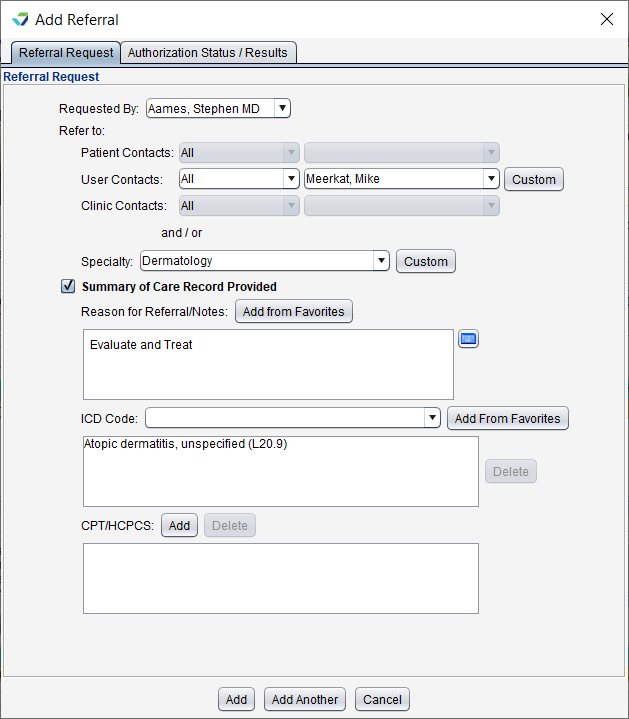
- Go to Encounter > Orders/Procedure > Orders/Referrals
- Click Add
- Select a user from the Requested By list
- Populate the Refer To and/or Specialty fields
- Select a contact from the Patient Contacts, User Contacts, or Clinic Contacts list or click Custom to add a new contact
- A specialty can be selected from the Specialty list or by clicking Custom to create a custom specialty
- Select the Summary of Care Record Provided checkbox
- Populate Reason for Referral/Notes by clicking Add from Favorites and selecting one or more items from the list or by typing directly in the free text field
- Add an ICD Code and/or CPT/HCPCS code
- An ICD code can be selected from the patient's active problem list or by clicking Add from Favorites to select a favorite ICD‑10 or search the Master List
- A CPT or HCPCS code can be selected by clicking Add to select a favorite order or search the Master List
- Click Add to create the referral or Add Another to create another referral
After an encounter is finalized, any referrals created in the encounter can be viewed in the Referrals tab in the patient chart.
-
Click Custom in the Refer to section of the referral
- Select Person or Business
-
The contact information can be populated using the following methods:
-
Click Search NPPES to search for and import a contact using the NPPES directory
-
Click Search in Directory to search for and import a contact using the Direct exchange email address directory
-
Manually enter the contact details for the person or business
-
- Optional: select Add to My Contact List checkbox to create a User Contact from this entry
- Click Save to add the contact
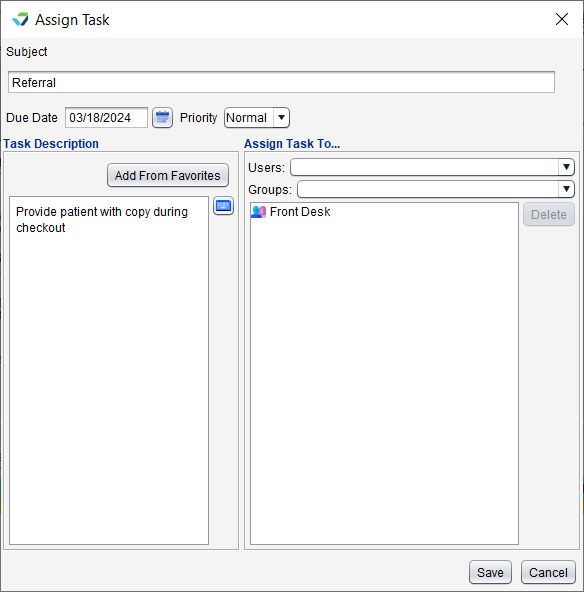
Referrals can be routed to other users in the clinic for review or to perform tasks related to the referral.
- Select the referral and click Assign/Route
- Populate the Due Date for the task or leave defaulted to the current date
- Select a Priority for the task or leave defaulted to Normal
- Populate the Task Description
- Click Add from Favorites and select one or more items from the list or type the task description in the free text field
- Search for and select a user or group for task assignment
- Multiple individual users, multiple groups, or a combination of users and groups can be selected
- Click Save to assign and route the referral task
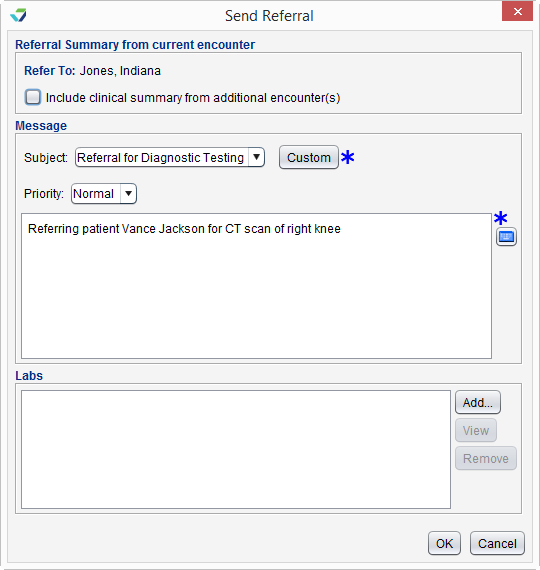
- Select a referral and click Send
- Optional: Select Include clinical summary from additional encounter(s) checkbox to send one or more additional encounters with the referral
- Populate the Subject and message body fields
- Select a favorite from the Subject selection list or click Custom and type a subject
- Optional: Click Add in the Labs section to attach one or more lab results
- Click OK to send
If the Include clinical summary from additional encounter(s) checkbox was selected:
- Select one or more encounters from the Select Encounter(s) window
- Optional: select an encounter and click View to view the encounter
- Optional: click Get Previous 5 Encounters to view more encounters
- Click OK
For steps on performing other tasks associated with referrals, see Referrals at the chart level.
Didn't find the answer you were looking for?
Contact Sevocity Support 24/7 at 877‑777‑2298 or support@sevocity.com
