Referrals
The Referrals tab is used to create and manage patient referrals. Referrals can also be created within a patient encounter from the Orders/Referrals tab.
- The Reason for Referral/Notes Add from Favorites list is customizable at the user and CLINIC level. Go to Tools > Preferences > CLINIC or [user] > Form Data > Begin Edit and select Referrals from the Tab list
- The ICD Code Add from Favorites list is customizable at the user and CLINIC level. Go to Tools > Preferences > CLINIC or [user] > Form Data > Begin Edit and select Assessment from the Tab list
- The CPT/HCPCS Add Favorites list is customizable at the user and CLINIC level. Go to Tools > Preferences > CLINIC or [user] > Form Data > Begin Edit and select Orders from the Tab list
- Task assignment Groups are customizable at the user and CLINIC level. Go to Tools > Preferences > CLINIC or [user] > Application Settings > Message/Task Groups
- The selection list for the Task Description Add From Favorites is customizable at the user and CLINIC level. Go to Tools > Preferences > CLINIC or [user] > Form Data > Begin Edit and select Task List from the Tab list
- Message favorites used when sending a referral through Direct Message can be customized by the Clinic Administrator by going to Tools > Preferences > CLINIC > Clinic Wide Form Data > Begin Edit and selecting Messaging from the Tab list
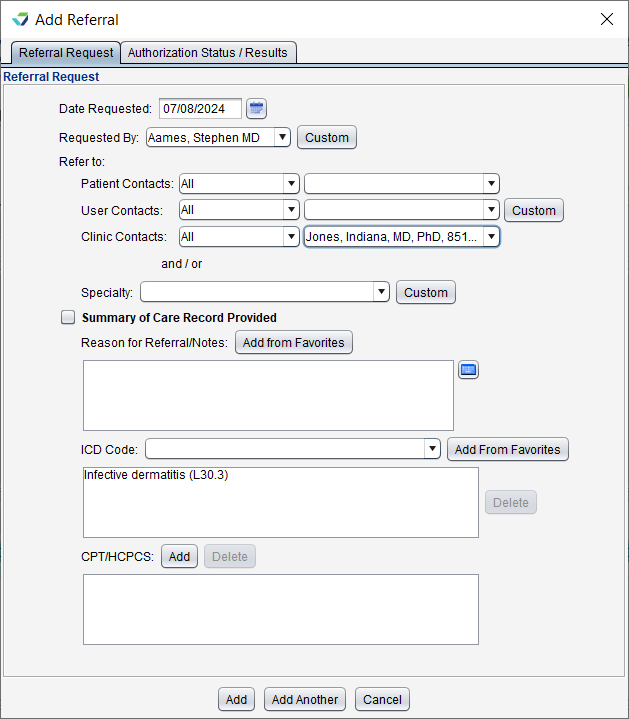
- Go to Chart > Referrals and click Add
- Populate the Date Requested
- Select a user from the Requested By list or click Custom and type a name in the Custom Requested By field
- Populate the Refer to and/or Specialty fields
- Select a contact from the Patient Contacts, User Contacts, or Clinic Contacts list or click Custom to add a new contact
- A specialty can be selected from the Specialty list or by clicking Custom to create a custom specialty
- Select the Summary of Care Record Provided checkbox
- Populate Reason for Referral/Notes by clicking Add from Favorites and selecting one or more items from the list or by typing directly in the free text field
- Add an ICD Code and/or CPT/HCPCS code
- An ICD code can be selected from the patient's active problem list or by clicking Add From Favorites to select a favorite ICD‑10 or search the Master List
- A CPT or HCPCS code can be selected by clicking Add to select a favorite order or search the Master List
- Click Add to create the referral or Add Another to create another referral
-
Click Custom in the Refer to section of the referral
- Select Person or Business
-
The contact information can be populated using the following methods:
-
Click Search NPPES to search for and import a contact using the NPPES directory
-
Click Search in Directory to search for and import a contact using the Direct exchange email address directory
-
Manually enter the contact details for the person or business
-
- Optional: select Add to My Contact List checkbox to create a User Contact from this entry
- Click Save to add the contact
- Go to Chart > Referrals
- Select a referral and click Update
- Click the Referral Request tab
- Add or update the necessary information
- Click Save
- Go to Chart > Referrals
- Select a referral and click Update
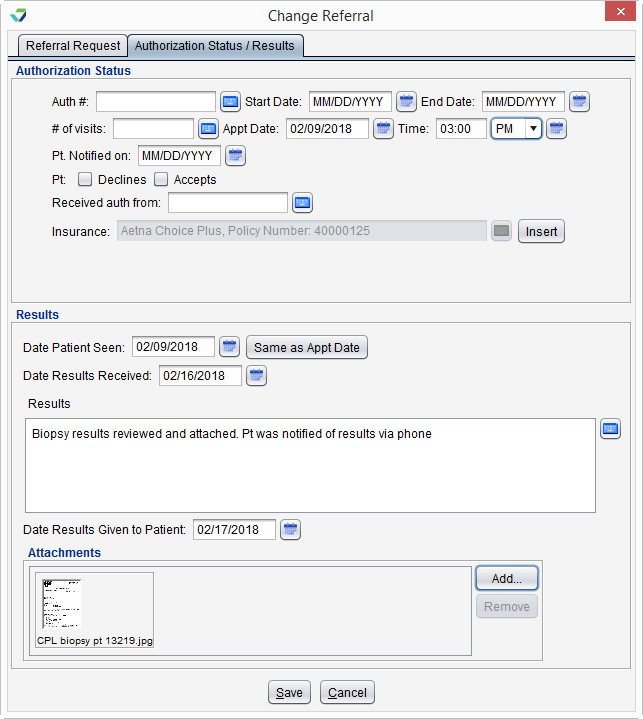
- Complete the appropriate fields of the Authorization Status section
- Clicking Insert for the Insurance field populates the field with the patient's primary insurance information
- Click Save
- Go to Chart > Referrals
- Select a referral and click Update
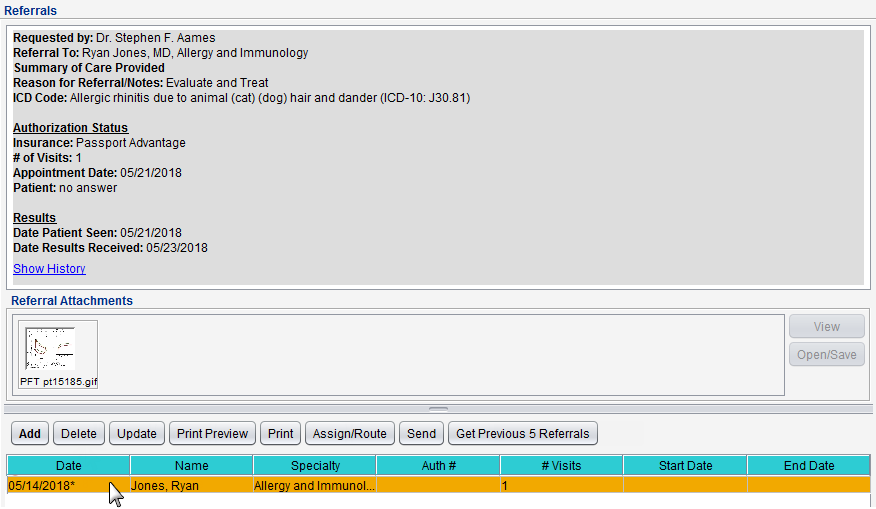
- Complete the appropriate fields of the Results section
- Clicking Same as Appt Date for the Date Patient Seen field populates the field with the Appt Date from the Authorization Status section, if completed
- Click Add in the Attachments section to add one or more file attachments
- Click Save
- Go to Chart > Referrals
- Select a referral and click Print Preview
- Select an encounter to send with the referral and click OK
- Select one or more lab result to send with the referral and click OK or click Skip
The referral is generated as a PDF
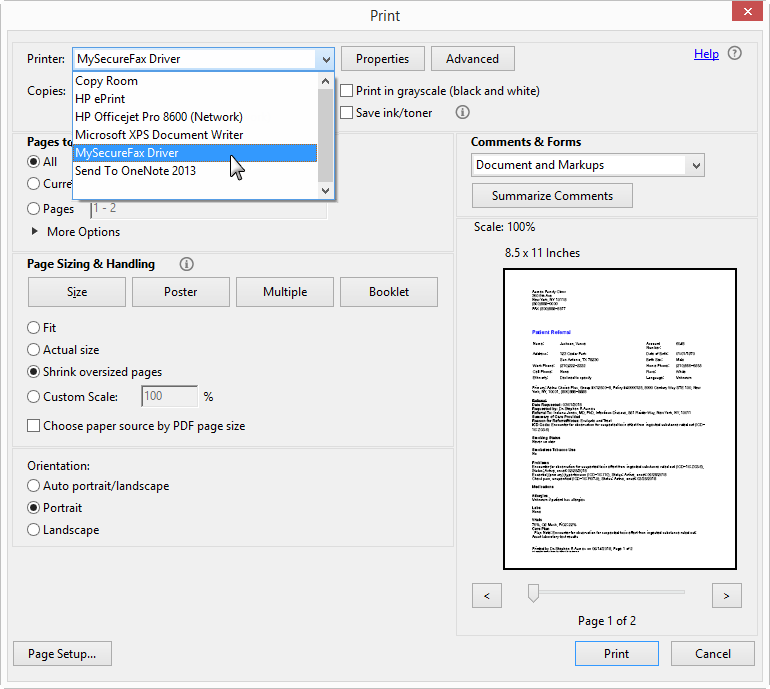
- From the PDF viewer, go to File > Print
- Select the electronic fax driver from the Printer list
- Click Print
- Follow any additional prompts required by the electronic fax driver to send the fax
Always use a secure electronic faxing service when transmitting PHI![]() Protected Health Information, any individually indentifiable health information
Protected Health Information, any individually indentifiable health information
Sending a referral through Direct Message![]() Sevocity feature that exchanges encrypted communication between two parties using DirectTrust (Direct) transport standards electronically transmits the patient information and referral details in a Referral Note C‑CDA
Sevocity feature that exchanges encrypted communication between two parties using DirectTrust (Direct) transport standards electronically transmits the patient information and referral details in a Referral Note C‑CDA![]() Consolidated Clinical Document Architecture, a document format that enables a patient’s clinical data to be transmitted from one Health IT system to another which can be viewed and incorporated into the patient’s record by the receiving provider.
Consolidated Clinical Document Architecture, a document format that enables a patient’s clinical data to be transmitted from one Health IT system to another which can be viewed and incorporated into the patient’s record by the receiving provider.
- Go to Chart > Referrals
- Select a referral and click Send
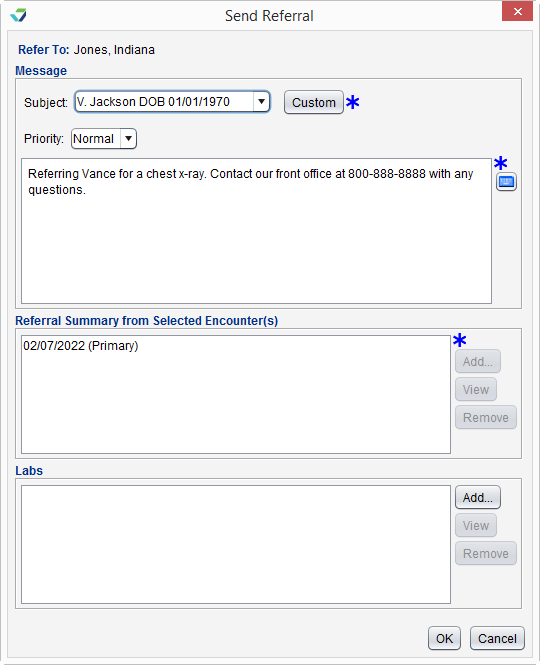
- Populate the Subject and message body fields
- Select a favorite from the Subject selection list or click Custom and type a subject
- Click Add in the Referral Summary for Selected Encounter(s) section to select one or more encounters to send with the referral
- Select an encounter from the top section of the Select Encounter(s) window. The location of the encounter selected is assigned as the location of the referral
- Optional: Select one or more encounters from the bottom section of the Select Encounter(s) window
- Optional: select an encounter and click View to view an encounter from the top or bottom sections
- Optional: click Get Previous 5 Encounters to view more encounters in the top or bottom sections
- Click OK
- Optional: Click Add in the Labs section to attach one or more lab results
- Click OK to send
The inability to send a referral using Direct Message because the Send button is disabled is rooted in one of two causes:
- The user does not have the required permission to send messages using Direct Message. See Direct Message Activation and Access
- The provider or practice to whom the referral is being sent does not have a secure email address in their contact profile. See About Secure Email Addresses
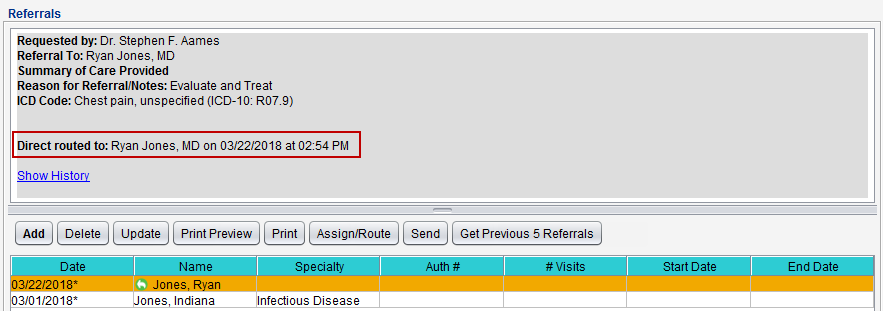
A green arrow icon will display next to the referral, indicating it has been sent using Direct Message. The contact to whom the referral was sent will also display in the referral view detail.
Messages that are not successfully transmitted to the intended recipient will generate an Undeliverable message in the Direct Message Inbox
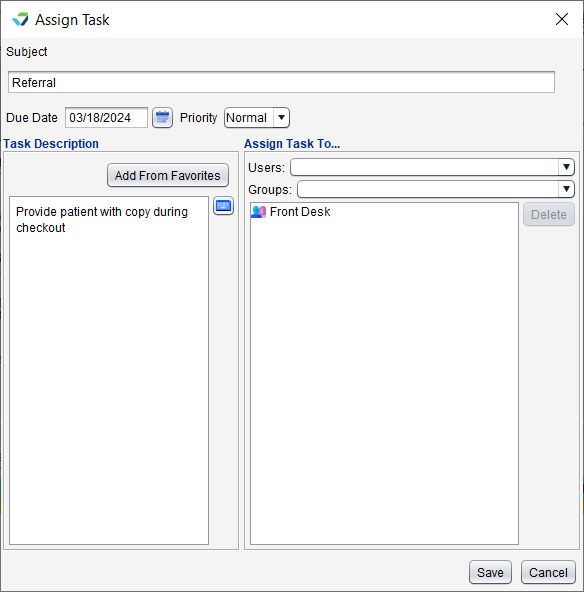
Referrals can be routed to other users in the clinic for review or to perform tasks related to the referral.
- Select the referral and click Assign/Route
- Populate the Due Date for the task or leave defaulted to the current date
- Select a Priority for the task or leave defaulted to Normal
- Populate the Task Description
- Click Add from Favorites and select one or more items from the list or type the task description in the free text field
- Search for and select a user or group for task assignment
- Multiple individual users, multiple groups, or a combination of users and groups can be selected
- Click Save to assign and route the referral task
Didn't find the answer you were looking for?
Contact Sevocity Support 24/7 at 877‑777‑2298 or support@sevocity.com
