Tools Menu: C-CDA Reconciliation
The C‑CDA Reconciliation tool imports and reconciles locally stored C‑CDA![]() Consolidated Clinical Document Architecture, a document format that enables a patient’s clinical data to be transmitted from one Health IT system to another files into a patient chart. The C‑CDA Reconciliation tool is also accessible from the Chart Tools menu.
Consolidated Clinical Document Architecture, a document format that enables a patient’s clinical data to be transmitted from one Health IT system to another files into a patient chart. The C‑CDA Reconciliation tool is also accessible from the Chart Tools menu.
C‑CDA files received in the Direct Message Inbox should be reconciled directly from the inbox.
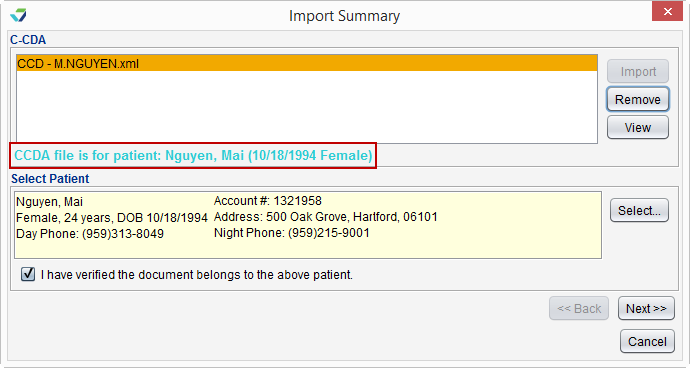
- Go to Tools > C‑CDA Reconciliation
- Click Import
- Locate and select the C‑CDA file from the local computer and click Open
The patient name, date of birth, and birth sex contained in the C‑CDA file display in the Import Summary
-
Click Select to search for and select a patient
-
Verify the patient from the file matches the patient selected and select the I have verified the document belongs to the above patient checkbox
- Click Next
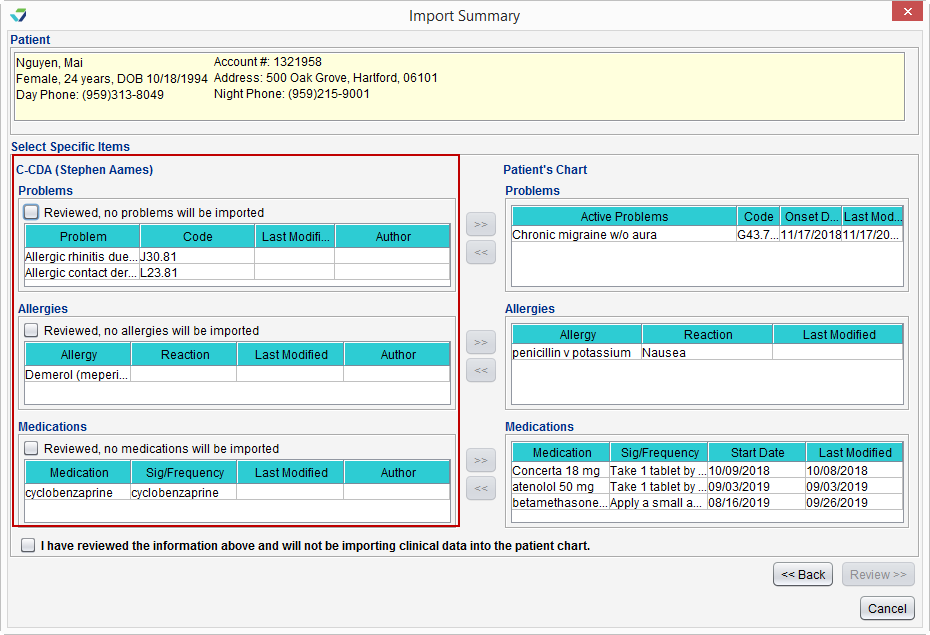
The Problems, Allergies, and Medications from the C‑CDA file display on the left and the problems, allergies, and medications in the Patient's Chart display on the right
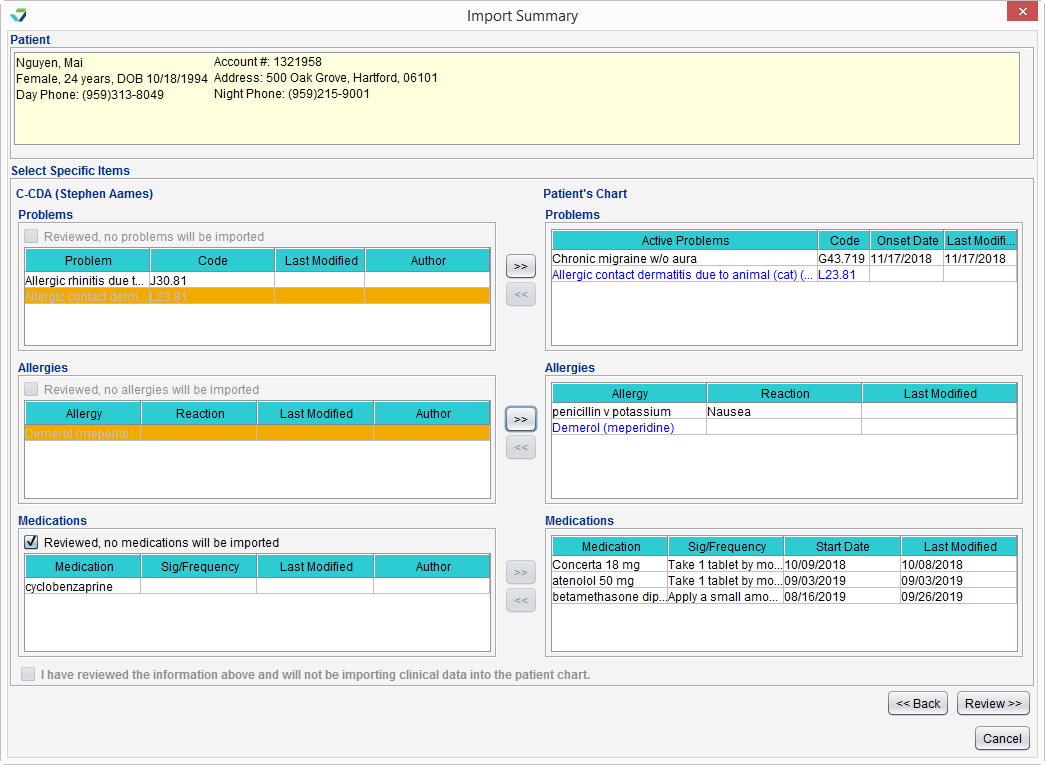
- Select an item from the C‑CDA Problems, Allergies, or Medications list and click
 to move the item to the Patient's Chart list
- The added item will display in blue text
- Repeat the process to add more items to the patient chart
- At least one problem, allergy, or medication must be added to the patient chart to complete the reconciliation
- To remove an item added from the C‑CDA file to the patient chart, select the item in the Patient's Chart list and click

-
Click Review
- Review the incorporated data for accuracy and click Sign to complete the reconciliation or click Start Reconciliation Encounter to document additional information in a Reconciliation encounter type
Any problems, allergies, and medications selected for reconciliation are incorporated into the patient's chart.
If there is not a clinically appropriate problem, allergy, or medication to add to the chart, the "Reviewed, no [problems/allergies/medications] will be imported" checkbox can be selected for that section of the C‑CDA
- Go to Tools > C‑CDA Reconciliation
- Click Import
- Locate and select the C‑CDA file from the local computer and click Open
The patient name, date of birth, and birth sex contained in the C‑CDA file display in the Import Summary
- Click Select to search for and select a patient
- Verify the patient from the file matches the current patient and select the I have verified the document belongs to the above patient checkbox
-
Click Next
-
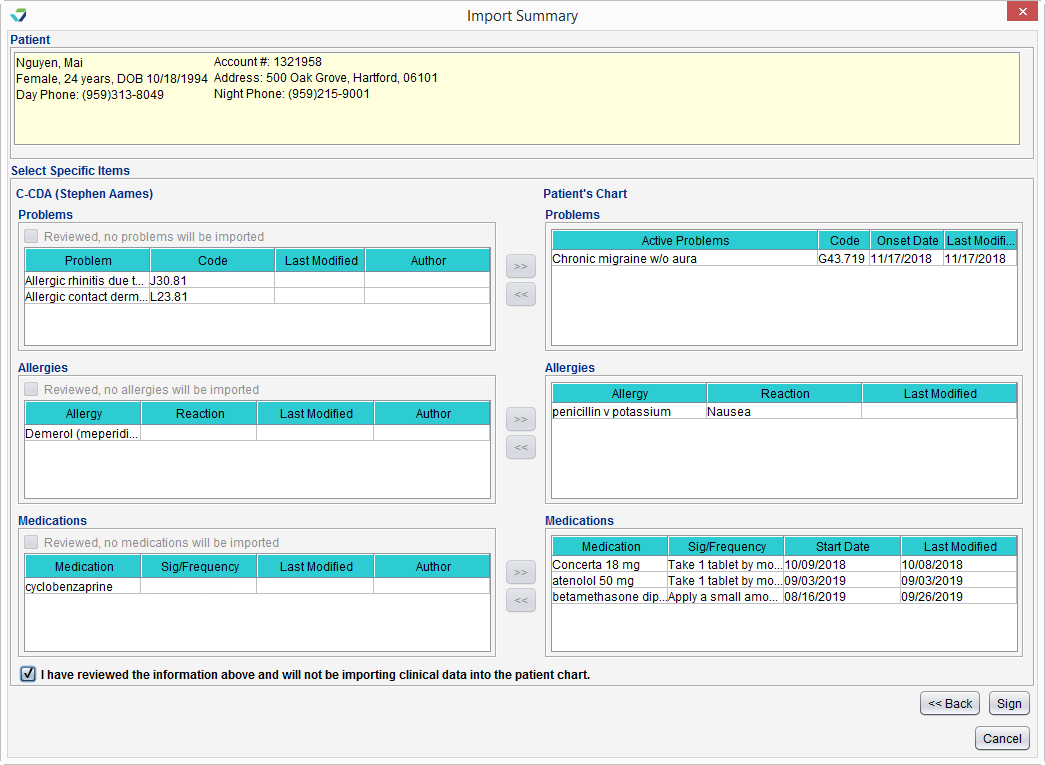
After reviewing the patient's Problems, Allergies, and Medications, select the I have reviewed the information above and will not be importing clinical data into the patient chart checkbox
- Click Sign to complete the reconciliation
If a user attempts to add a problem/allergy/medication to a patient chart when the patient has a documented entry of No Known problems/allergies/medications, a message will display alerting the user that adding the problem, allergy, or medication will inactivate the current patient chart entry. The user will need to click Yes to confirm the data overwrite or click No to cancel the action.
If a user attempts to add an entry of No Known problems/allergies/medications to a patient chart with a documented problem/allergy/medication, a message will display alerting the user to the contradictory entry and will prevent the user from adding the data to the chart.
The C‑CDA file and reconciliation activity are stored as a Reconciliation encounter type and can be viewed in the Past Encounters tab of the patient chart.
If C‑CDA Reconciliation is not visible in the Tools menu, the user does not have the required permissions to reconcile C‑CDA files. To access the C‑CDA Reconciliation tool, users must have Clinic Administrator privileges, an Access Level of Restricted Chart Entry or Full Chart, and Can Sign selected for Image/File Import in their user profile
Didn't find the answer you were looking for?
Contact Sevocity Support 24/7 at 877‑777‑2298 or support@sevocity.com


