Immunizations
The Immunizations tab captures vaccines administered during an encounter and a patient's historical immunizations. A patient's immunization information carries forward to each subsequent visit.
Immunizations is available in the following encounter types: Exam, Multi-System, Historical, Immunization, Procedure, Reconciliation, Telephone, and Urgent Care.
- The vaccine administration selection list items for Dosage, Reaction, and Serum can be customized by the Clinic Administrator by going to Tools > Preferences > CLINIC > Clinic Wide Form Data > Begin Edit and selecting Immunizations from the Tab list
- The PPD vaccine selection list items for Result, Induration, and Action can be customized by the Clinic Administrator by going to Tools > Preferences > CLINIC > Clinic Wide Form Data > Begin Edit and selecting Immunizations from the Tab list
- The display order for documented immunizations can be set by the Clinic Administrator by going to Tools > Preferences > CLINIC > Clinic Settings: Display and selecting Ascending or Descending for Immunizations by Date
- If using a barcode scanner to scan vaccine vials, see Sevocity's System Requirements page for product specifications and guidance on compatible barcode scanners
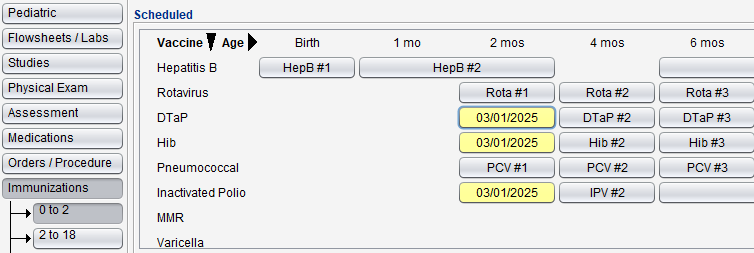
The Immunizations tab is comprised of three subtabs:
- 0 to 2: displays the CDC
 Centers for Disease Control and Prevention immunization schedule for patients ages 0 to 2 years
- Includes supplemental documentation sections for Influenza, PPD, Pneumococcal (PPV), COVID-19, and Other immunizations
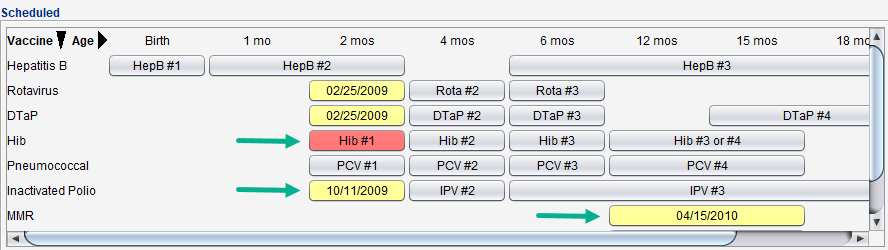
- 2 to 18: displays the CDC immunization schedule for patients ages 2 to 18 years
- Includes supplemental documentation sections for Influenza, PPD, Pneumococcal (PPV), COVID-19,, and Other immunizations
- Adult: displays recommended immunizations for patients over 18 years of age
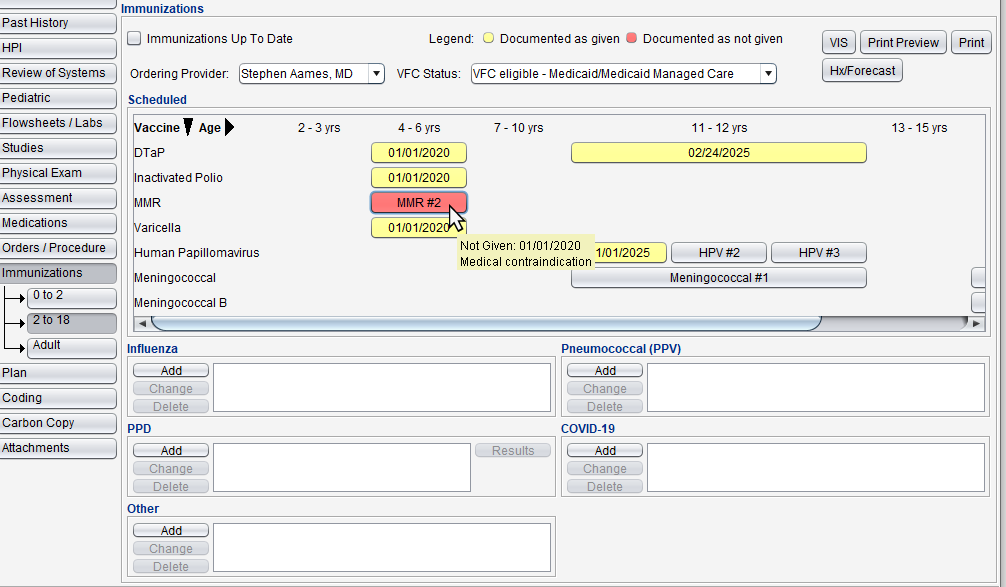
Upon clicking the Immunization tab, the subtab that correlates to the patient's age will display.
- Immunizations Up To Date: selecting this checkbox adds the statement “Immunizations Up to Date” in the Immunizations section on the encounter note
- Ordering Provider: displays a selection list of all providers at the clinic. For clinics with only one provider, the field is automatically populated with the provider's name
- Clinics with a state immunization interface are required to select an Ordering Provider for any vaccines administered at the clinic
- Legend: color codes the scheduled immunization buttons to communicate administration status
- Displays in the 0 to 2 and 2 to 18 subtabs only
- Positioning the cursor over an immunization documented as Not Given displays the reason the dose was not given and the date it was documented
- VFC Status: displays a selection list of eligibility statuses for the Vaccines for Children Program
- Displays for clinics with a state immunization interface
- Displays in the 0 to 2 and 2 to 18 subtabs only
- VIS: clicking this button displays all available Vaccine Information Statements to view or print
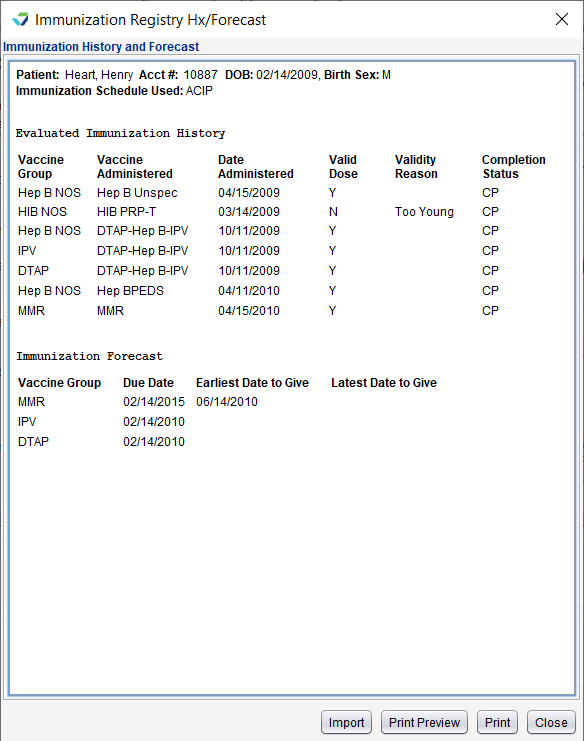
- Hx/Forecast: clicking this button provides a patient’s immunization histories and forecasts
- This button displays for clinics with a bi-directional immunization interface that provides history and forecast information
- If history and forecast information is provided, the interface can be configured to import a patient's immunization history into the encounter using this feature
Immunizations can only be documented on the day of the encounter. Users who attempt to add a vaccine administration record in an encounter set to a future date will only be able to add a Historic immunization record.
- Go to Encounter > Immunizations
For 0-2 and 2-18, click the scheduled immunization button
For Adult, click Add next to the immunization name
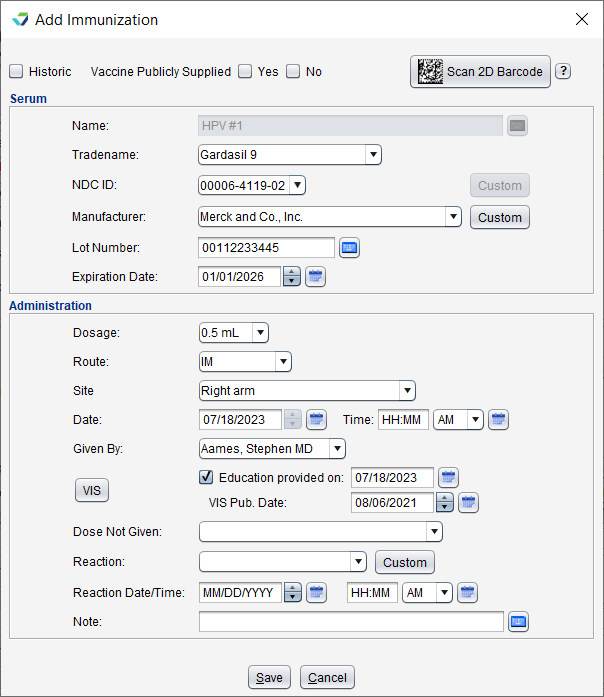
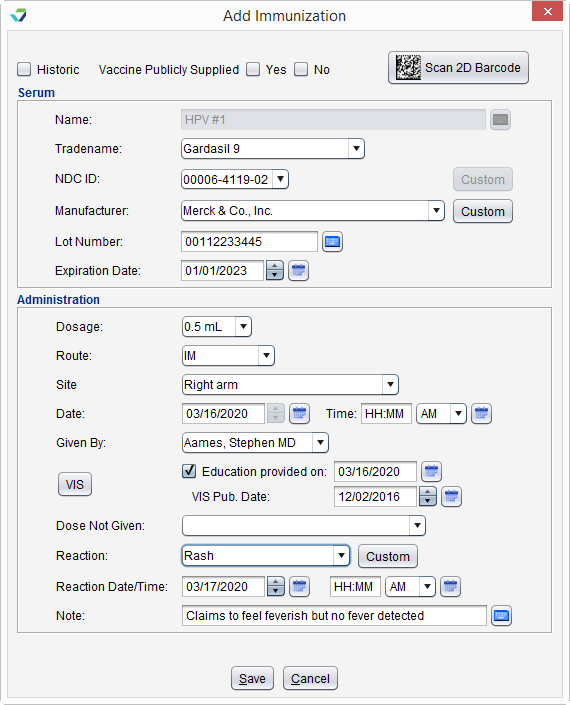
- Populate all the fields in the Serum section by scanning the vaccine vial or by manual entry
To scan the vaccine vial, click the Scan 2D Barcode button and scan the vial when prompted:

- If populating the fields manually, the NDC ID selection list and Manufacturer name automatically populate based on the Tradename selected
- Populate the applicable fields in the Administration section
- Date defaults to the encounter date but can be updated
- Given By defaults to the logged in user but a different user can be selected
- Optional: click VIS to view or print the Vaccine Information Statement for the vaccine
- Clicking Preview or Print for the VIS will automatically select the Education provided on: checkbox and populate the encounter date in the date field and populate the VIS Pub. Date
- Click Save
- Go to Encounter > Immunizations
For 0-2 and 2-18, click the scheduled immunization button
For Adult, click Add next to the immunization name
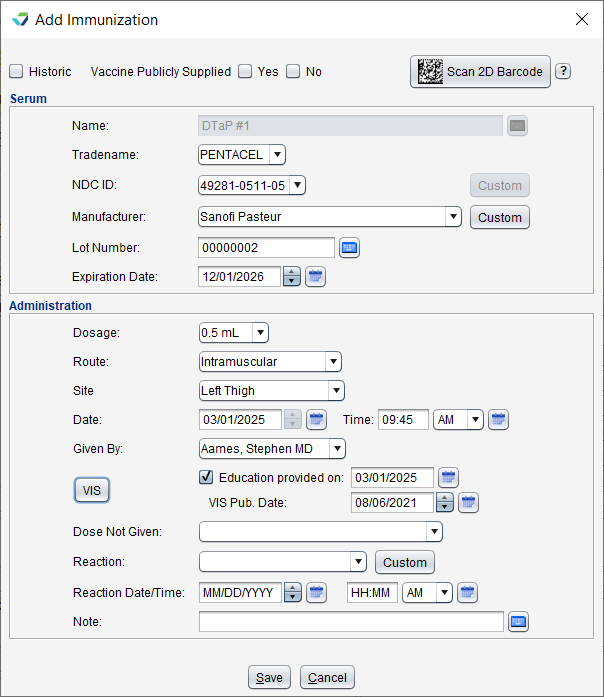
- Populate all the fields in the Serum section by scanning the vaccine vial or by manual entry
To scan the vaccine vial, click the Scan 2D Barcode button and scan the vial when prompted:
- If populating the fields manually, the NDC ID selection list and Manufacturer name automatically populate based on the Tradename selected
- Populate the applicable fields in the Administration section
- Date defaults to the encounter date but can be updated
- Given By defaults to the logged in user but a different user can be selected
- Optional: click VIS to view or print the Vaccine Information Statement for the vaccine
- Clicking Preview or Print for the VIS will automatically select the Education provided on: checkbox and populate the encounter date in the date field and populate the VIS Pub. Date
Click Save
Select the additional vaccines to which the same information will apply
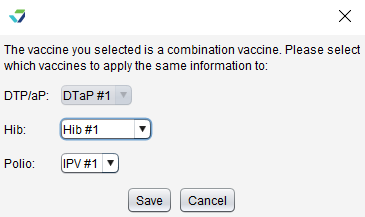
Click Save
All vaccines selected are documented in the encounter
- Go to Encounter > Immunizations
For 0-2 and 2-18, click the scheduled immunization button
For Adult, click Add next to the immunization name
- Select the Historic checkbox
- Populate the date the immunization was given in the Date field of the Administration section
- Optional: for historical Influenza immunizations, select a location from the Received At list
- Click Save

Clinics with a bi-directional immunization interface are able to import a patient's immunization history into the encounter if the information is provided by the registry and configured for import.
Go to Encounter > Immunizations
Click Hx/Forecast to view the patient's Immunization History and Forecast
Click Import to review and import the patient's immunization history
Select each immunization record to be imported into the encounter and where it should be documented in the immunization schedule (Import As)
Note: immunizations will be imported as historical entries
Click Import Selected
Click OK to acknowledge the immunizations were imported
Navigate to the appropriate immunization schedule to view the imported immunizations

- Go to Encounter > Immunizations
For 0-2 and 2-18, click the scheduled immunization button
For Adult, click Add next to the immunization name
- Update the Date field in the Administration section if needed
- Select a reason from the Dose Not Given list in the Administration section
- Click Save

A patient reaction to an administered vaccine is documented in the original administration record. The reaction can be updated within the same encounter or in a subsequent encounter.
- Go to Encounter > Immunizations
For 0-2 and 2-18, click the scheduled immunization button that contains the administration information
For Adult, select the documented immunization and click Change
- Select a description from the Reaction list or click Custom, type a reaction description, and click Save
- Optional: populate the Reaction Date/Time and type a Note
- Click Save
After documenting the administration of a PPD skin test, the Results button becomes enabled.

- Go to Encounter > Immunizations
- Select the PPD skin test record and click Results
- The PPD Read on Date defaults to the encounter date but can be updated
- Document one or more of the following fields:
- PPD Result
- PPD Induration
- PPD Action
- PPD Read By
- PPD Note
- Click Save

Clinics with a VaxCare bi-directional interface are able to order and send vaccines to VaxCare directly from the Immunizations encounter tab and receive vaccine administration details that can be stored to the encounter.
Immunizations Sent to VaxCare will be highlighted in light blue, and when information is received from VaxCare (Information Required), the immunization will be highlighted in light purple. Note: encounters cannot be finalized if an immunization indicates either of these statuses.

- Go to Encounter > Immunizations
For 0-2 and 2-18, click the scheduled immunization button
For Adult, click Add next to the immunization name
- Select a Tradename
- Optional: select a Corresponding Order
- Select the Ordering Provider
- If a Corresponding Order is selected, the Ordering Provider will be automatically populated
- Select a VFC Status
Click Send to VaxCare
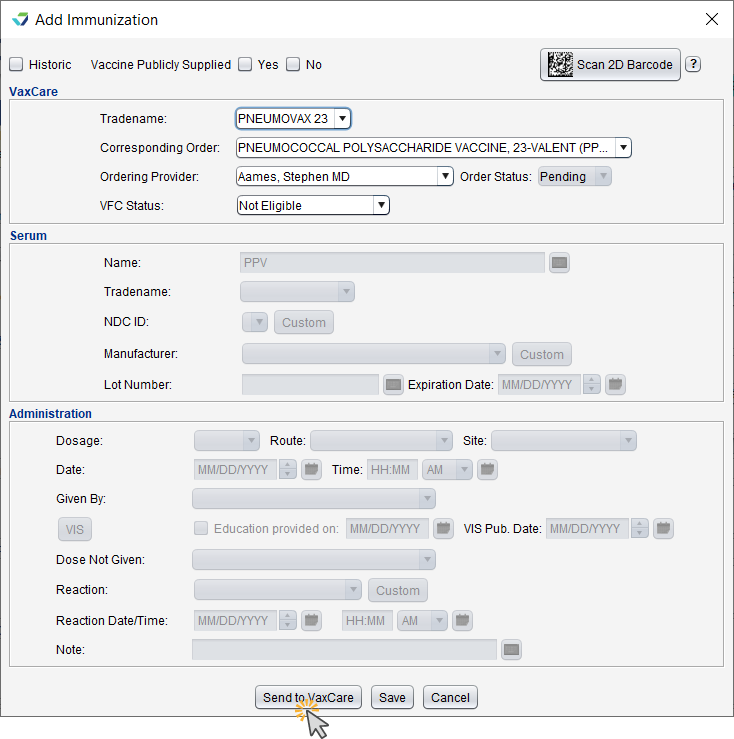
- A confirmation will display when the immunization has been sent. Click OK to acknowledge
- Go to Encounter > Immunizations
For 0-2 and 2-18, click the scheduled immunization button
For Adult, click Add next to the immunization name
Select an immunization with a status of Information Required (light purple highlight)
Review the immunization information and populate any missing information
Click Save to document the immunization as given
Didn't find the answer you were looking for?
Contact Sevocity Support 24/7 at 877‑777‑2298 or support@sevocity.com