Release Notes December 19, 2025
In This Release....
As part of the USCDIv3 updates, several new data elements have been added to enhance documentation and reporting within the Health Guidelines tool.
New Health Guideline Additions include:
-
SDOH Assessment
-
SDOH Problems / Health Concerns
-
SDOH Goals
-
SDOH Interventions
-
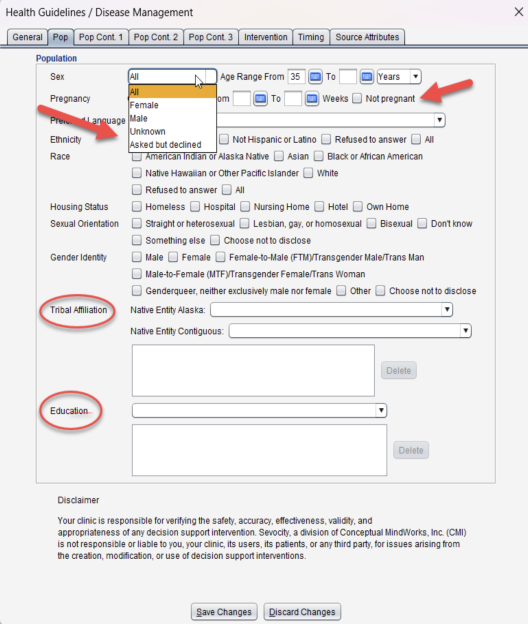
Sex
-
Functional Status
-
Disability Status
-
Mental / Cognitive Status
-
Pregnancy Status
-
Smoking Status
Updates to the Health Guidelines Tool – Pop Tab:
-
“Asked but declined” option added to the Sex dropdown
-
Not pregnant
-
Tribal Affiliation
-
Education
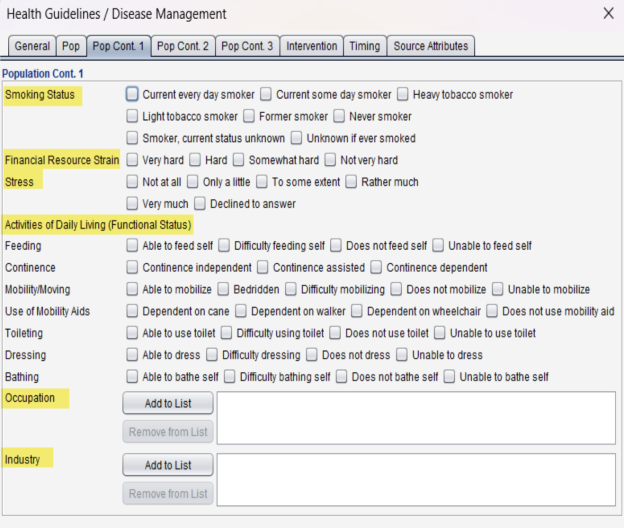
Pop Cont 1 Tab:
Addition of the following:
-
“Smoking Status”
-
“Financial Resource Strain”
-
“Stress”
-
“Activities of Daily Living (Functional Status)” - all the items which fall under ADLs
-
“Occupation”
-
“Industry”
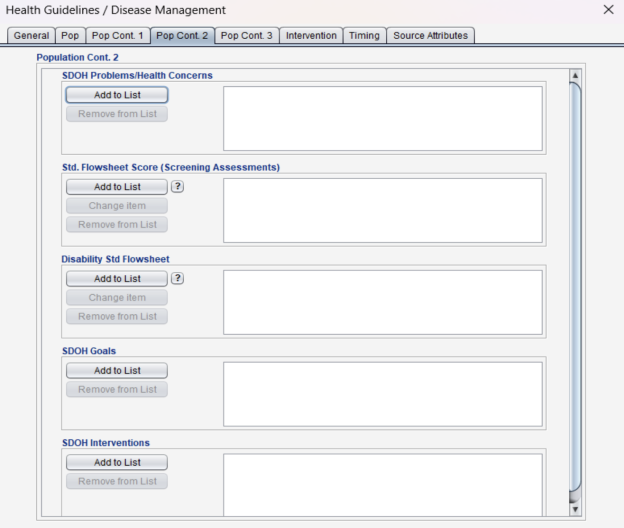
Pop Cont 2 tab:
Additions of the following:
-
SDOH Problems / Health Concerns
-
Standard Flowsheet Score (Screening Assessments)
Note: The lookback period for Standard Flowsheet Scores and Disability Standard Flowsheet responses is 2 years. The most recent Flowsheet result will be used to populate the Health Guideline. Additional details are available by selecting the“?” con next to Standard Flowsheet and Disability Standard Flowsheet. -
Disability Standard Flowsheet
-
SDOH Goals
-
SDOH Interventions
Attributes Tab:
-
The Attributes tab updates to reflect USCDIv3 for the Data Standards
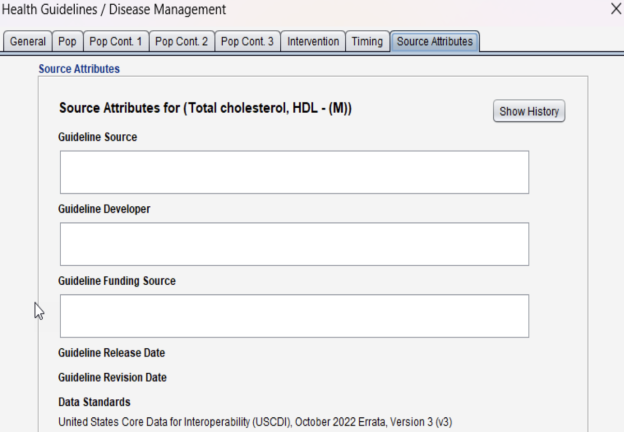
Chart Attributes Updates
-
Chart Attributes have also been updated to support the new USCDIv3 requirements and expanded SDOH data elements.

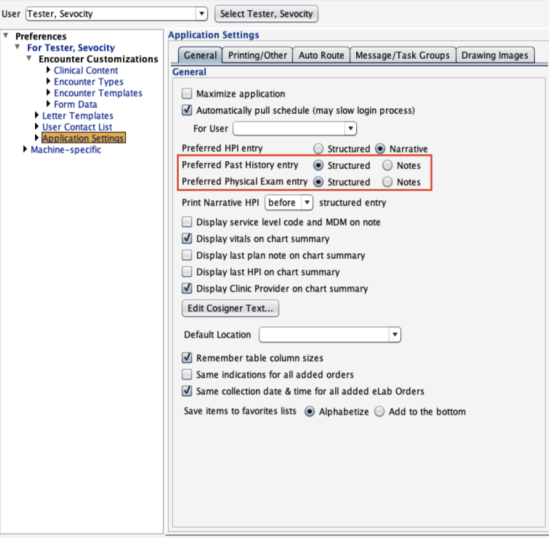
We’ve added a new user preference that allows you to choose how the Past History and Physical Exam sections open either in Structured format or in Notes.
Where to Update This Setting:
-
Go to Tools > Preferences > User = CLINIC, or
-
User > Application Settings > General
The default setting will remain Structured, but users can now change it to Notes if preferred.
When Notes is selected, opening the Past History or Physical Exam tab during an encounter will automatically display the Notes view.
We’ve added the ability for customers to create coded nodes linked to LOINC codes for use in Clinical Test and Diagnostic Report results. This enhancement allows you to easily name the node, search and select the appropriate LOINC code, capture results, and record the associated date, helping provide interoperable functionality.
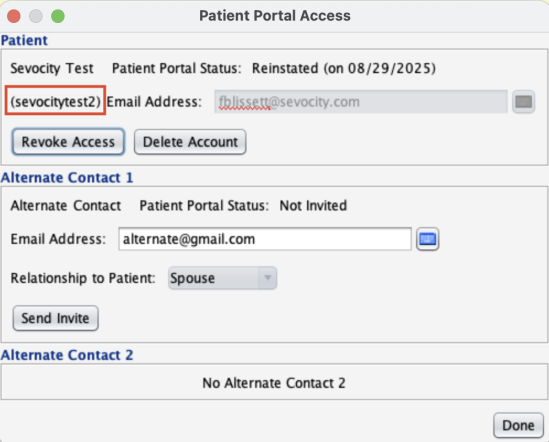
Portal usernames will now be visible directly within Sevocity. You can find them in:
-
Chart > Chart Tools > Patient Portal, or
-
Tools > Patient Portal > Add/Edit Patient/Alternate Contact
This enhancement allows clinic staff to easily provide a patient or alternate contact with their username if they call in and have forgotten it.
Attributes Tab:
-
The Attributes tab updates to reflect USCDIv3 for the Data Standards
We’ve enhanced the way changes within the medication portal are identified, allowing the system to sync a patient’s chart only when updates are truly needed. This improvement helps reduce unnecessary syncing and supports a smoother, more efficient user experience.
CCDA Reconciliation has been updated to include resolved problems. In addition to active problems, resolved problems can now be imported into a patient chart, providing a more complete clinical history.
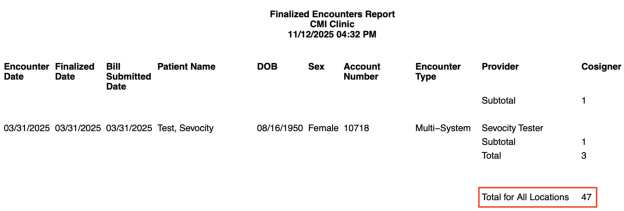
We’ve added a new enhancement to the Finalized Encounter Report. The total number of encounters across all locations will now display at the bottom of the PDF when applicable.
How It Works:
-
Reports > Encounters > Finalized > Create Report
When “Total for All Locations” Will Display:
-
Locations = All, Users = All
The bottom of the PDF will display “Total for All Locations: #”, showing the combined total of encounters from every location. -
Locations = All, Users = One User
The same “Total for All Locations: #” will display, totaling encounters across all locations for that user.
When It Will Not Display:
-
Locations = One location (Users = All or One User)
Only the total for that specific location will display. A combined total for all locations will not appear.
We’ve made slight updates to the icons within the chart tabs as part of the new theme. These refreshed icons are designed to improve visibility and make it easier to quickly identify each section of the chart.
Updated Indicators text to display differently and allow the text to be bolded.
![]()
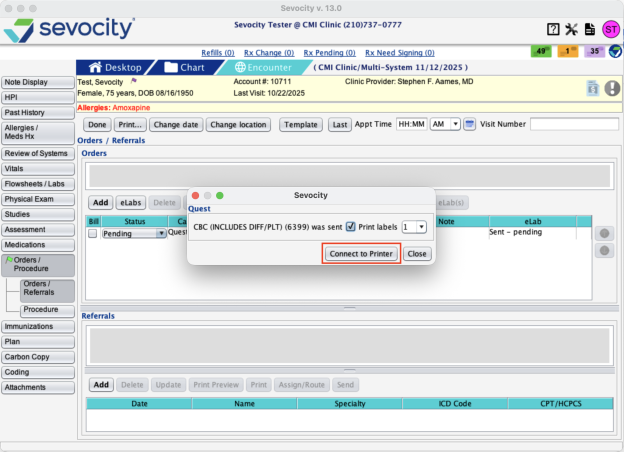
After an order is sent, users will see a “Connect to Printer” option on the confirmation screen. Clinics with a compatible label printer can select this option to connect and print labels. Clinics without a printer can simply close the dialog and continue their workflow without interruption.
When “Connect to Printer” is selected, the Quest Label Printer Settings window will open. If a DYMO printer is available, users can select it from the list of compatible printers, save their settings, and proceed with printing labels as needed.
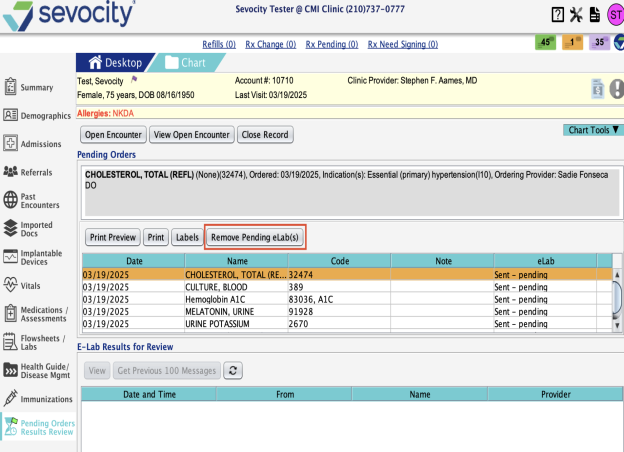
We’ve added a new feature that allows users to clear pending eLab orders that are not automatically completing. This should only be used after results have been received and stored in the patient’s chart, but the order still appears as “Sent – Pending.”
How It Works:
-
Go to Chart > Pending Order/Results Review.
-
A new button labeled “Remove Pending eLab(s)” has been added.
-
Select the lab(s) that have results stored in the chart but are still marked as “Sent – Pending.”
-
Once selected, the Remove Pending eLab(s) button will become active.
-
Click the button to open the Remove Pending eLab(s) dialog.
In the Dialog:
-
The dialog will list all selected orders (multiple orders may be removed at once).
-
You may choose “View Stored eLab Results” to verify that results are indeed saved to the patient chart.
-
If everything looks correct, select “Remove”.
-
This will update the order status by removing it from the Pending Orders queue (marking it complete).
-
-
A confirmation message will display listing all removed orders.
-
Select OK to close the dialog.
If you choose “Cancel,” the dialog will close without making any changes.
Once removed, the eLab order(s) will no longer appear in the Pending Orders table.
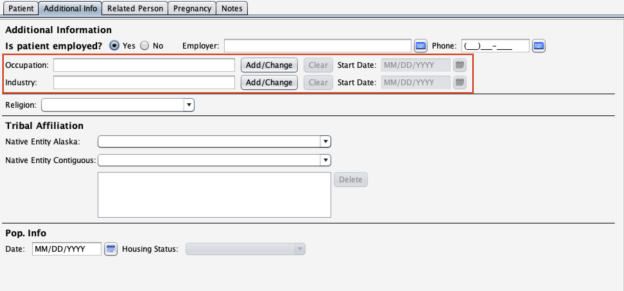
We have updated the Additional Info tab in Patient Demographics to support coded Occupation and Industry entries compliant with USCDI v3.
What’s New:
-
The Additional Info tab now includes updated fields for Occupation and Industry.
-
To add an occupation, select Add/Change to open the Occupation dialog.
-
Begin typing in the search bar—matching occupation options will appear.
-
Select the appropriate occupation and click Add.
-
Adding an industry works the same way, but uses a different compendium.
-
After selecting Add, the occupation or industry will be added to the record.
Users may also enter a start date if applicable.
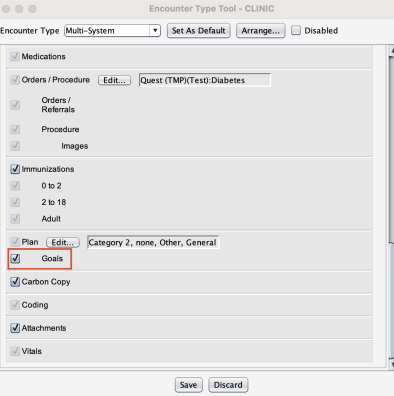
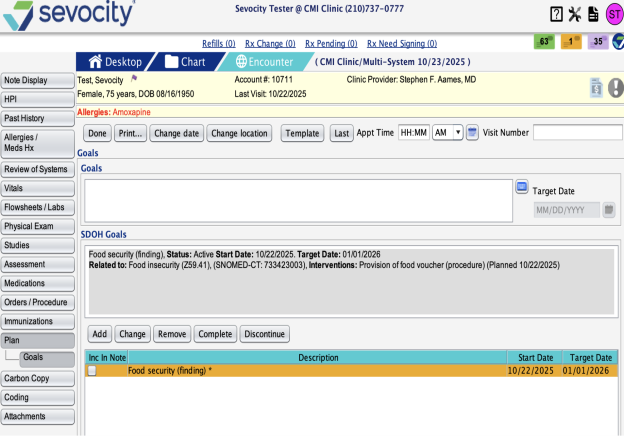
To support USCDIv3 data elements, we’ve added a new Goals tab within the encounter. This includes expanded functionality for SDOH Goals and Interventions.
Enabling the Goals Tab
Clinics can enable this tab through:
Preferences > User = CLINIC > Encounter Types
-
Under the Plan section, select the Goals checkbox.
-
When enabled, a new Goals sub-tab will appear under the Plan tab in the encounter.
Questions about our new features?
Contact Sevocity Support 24/7 at 877‑777‑2298 or support@sevocity.com